Thank you so much to all who entered!! I was really happy that it was so many folks who were already followers, because I really do the giveaways for my readers (though wish ya'll were a little more talkative ;) I'm a really social person and enjoy interaction with people in all kinds of ways. :)
So I used a random number generator thingy and the winner is Misty! :) So Misty, email me your addy and I'll get it in the mail! :)
Well, I was going to post something crafty today to, but kids are out of school early and it's yucky outside and my bathrooms really need some attention! So enjoy you're weekend and next week I will share the fun crafting I've done with my oldest daughter and other fun stuff!!

Friday, January 29, 2010
Thursday, January 28, 2010
Last day to enter to win your cupcake fix!!!
Go to the previous post below to enter. Contest ends tonight. I'll announce the winner tomorrow. Then we'll get back to crafting business and some Valentine's stuff! :)
Speaking of giveaways, a local friend of mine who is new to blogging, is offering her own giveaway this morning. So if ya wanna go win a cute handmade bag, head over to Fussy Monkey Business. :)
Speaking of giveaways, a local friend of mine who is new to blogging, is offering her own giveaway this morning. So if ya wanna go win a cute handmade bag, head over to Fussy Monkey Business. :)
Tuesday, January 26, 2010
SWEET!! Giveaway!!
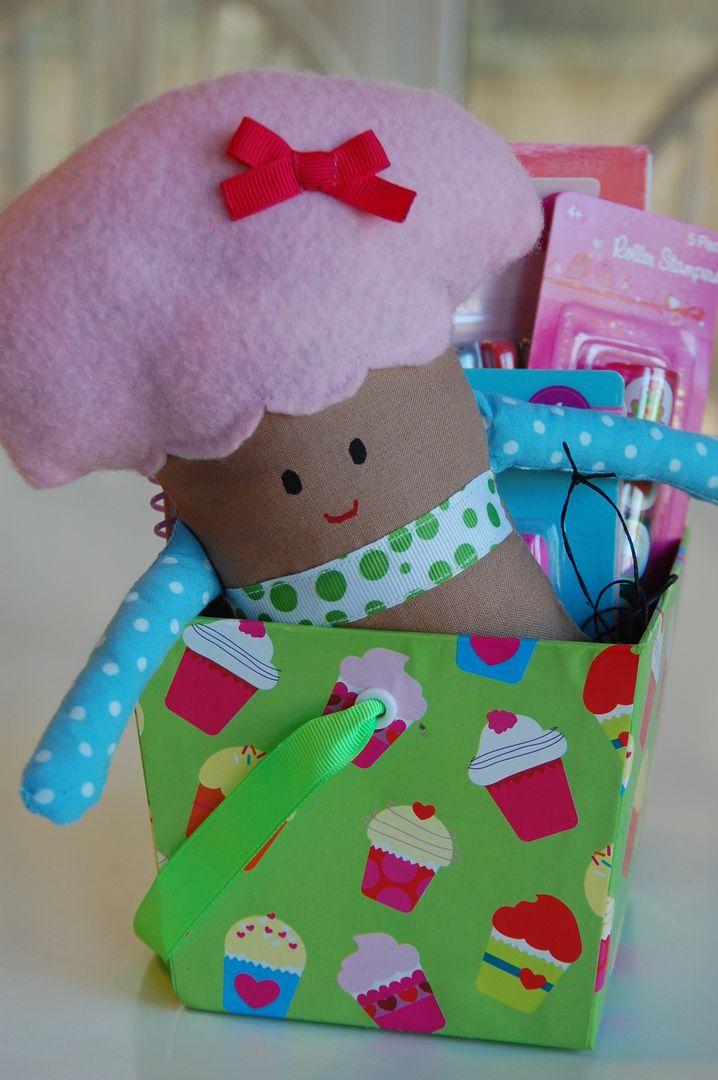
Ok, in honor of our cupcake obsession around here, I'm going to share the love! So here is my SWEET! giveaway! This box full of cupcake cuteness!

So how to enter?? Simple, leave a comment! Tell me your fav cupcake flavor and feel free to share recipes and/or links. Still trying to decide what kind to make for the birthday. I'm told it has to include pink. And sprinkles. :) I'll likely keep the kids cupcakes simple, but would love to try something new for the adult cupcakes.
Want an extra entry? Become a follower and leave a second comment. Already a follower? Also leave a second comment telling me so. :)
Giveaway to US residents only.
Giveaway entry deadline is Thursday, January 28th. I will announce the winner sometime on Friday!
Good luck!
**Contest Closed! Winner announced this afternoon!**
Monday, January 25, 2010
Lil Miss Cupcake
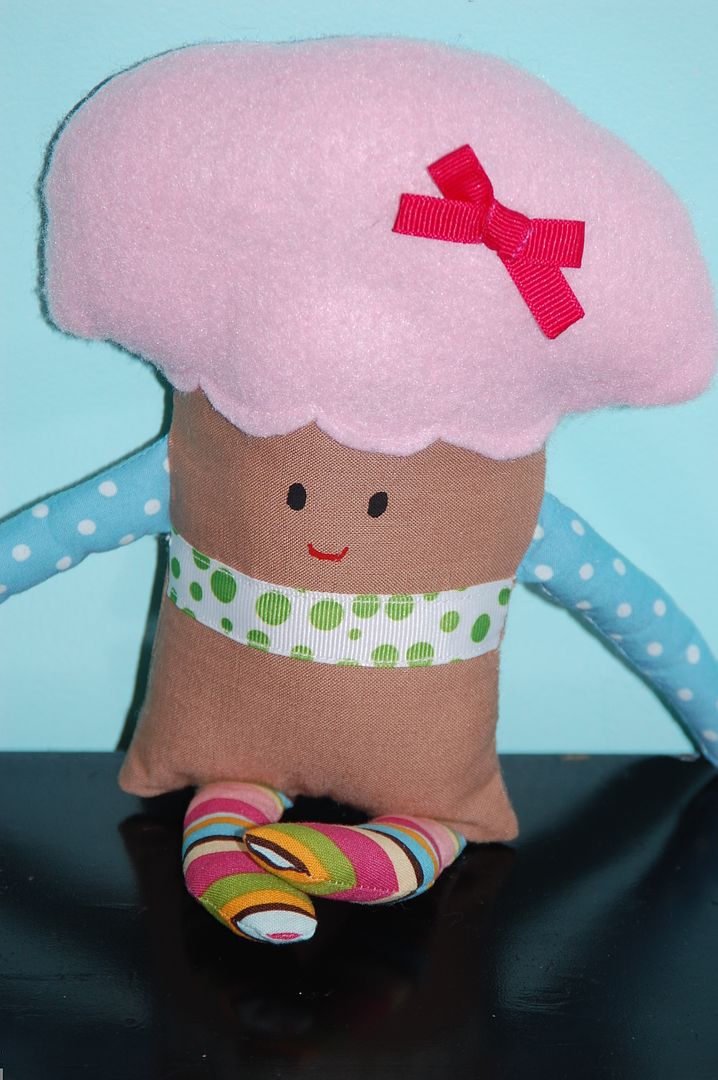
This is Lil Miss Cupcake. She's super easy to make. :) Just need a few scraps of fabric and some felt.

Just cut out 2 felt cupcake frosting hair, brown rectangle and draw some legs and arms on fabric with water soluble pen. Sew along the drawn lines of the arms and legs leaving the ends open.

Turn them out.

Then stuff them.

Sew the frosting hair to the brown cupcake body.

On other end, sew down the legs securely.

Do the same with the arms. If you care to embellish the front with ribbon or whatever, do that before sewing the arms and legs. I also sewed a bow on the hair at this point too.

Still didn't get that sewing room back together. Too busy with basketball game, church, playing with kids, cat napping and just being lazy! ;) Now to help them practice piano, check homework, clean the kitchen and watch more Pink Panther with the kids and show them the Ant and the Aardvark...ahhh the nostalgia. :)
** Tomorrow come back for the SWEET! giveaway!
Friday, January 22, 2010
Happy Friday!
Hi all,
Feeling blah today and just don't feel like bustin' my hiney to bring you my next craft project. :) It's almost done. But I've played with the kids at our children's museum this morning and now it's down time/lunch time for me and I really just wanna put my torn apart craft room back together. I think I've had a little cupcake overload. ;) But Maressa can't get enough. She's played out her party with her play cupcakes and ice cream over and over.
Anyhoo, I'll be back Monday for my next cupcake project and next week will do promised giveaway.
:)
Thursday, January 21, 2010
Quick Kids Cupcake Apron

I'm working on some of the party favors for Maressa's 3rd bday, If You Give a Cat a Cupcake Party. I guess it's turning into more 'cupcake' than 'cat' part. ;) Anyway, these simple and quick aprons would make fun Valentine's Day or party favors or gifts.
All you need to make your own is a kid's sized blank apron from the hobby store (Walmart may have them too), acrylic paint, paint brushes and a cupcake stamp.

First you start with a cupcake stamp. Don't have one? Neither did I, so I made one with supplies I had around the house. You need a foam sheet and wood block. I drew a cupcake shape onto the yellow foam sheet. Once satisfied with my shape, I cut it out with scissors.

Now use craft glue to glue the cupcake to the block.

After testing my stamp a few times, I decided I wanted a separate top and bottom to the cupcake. So I took drew a line in between how I wanted it to look. Then I took a sharp cutting blade and cut along the line. Then I cut just a tiny bit beside the 1st cut and pulled out the extra foam. Then I used a paint brush to generously paint the cupcake stamp.

Press firmly down. If you are like me and not quite sure what colors you want and want to play around with the overall design use some scrap fabrics to practice on. When you pull your stamp up, there may be places without paint. Not a problem. Use a paint brush to carefully fill them in.
Also. Be sure to place your apron on newspaper,cardboard, throw away table cloth or something else that is ok to get the paint on. It might seep through a bit. I keep a flannel back table cloth that I use for covering my table when painting. :)
Now if you want to add sprinkles, I just used a thin bristle paint brush to paint on a few once cupcake was dry. I also used a small heart foam stamp for the red heart on top.

And voila! Cupcake apron for all your miniature bakers!
Wednesday, January 20, 2010
Giant Cupcakes ~easy to make centerpiece for your next party!
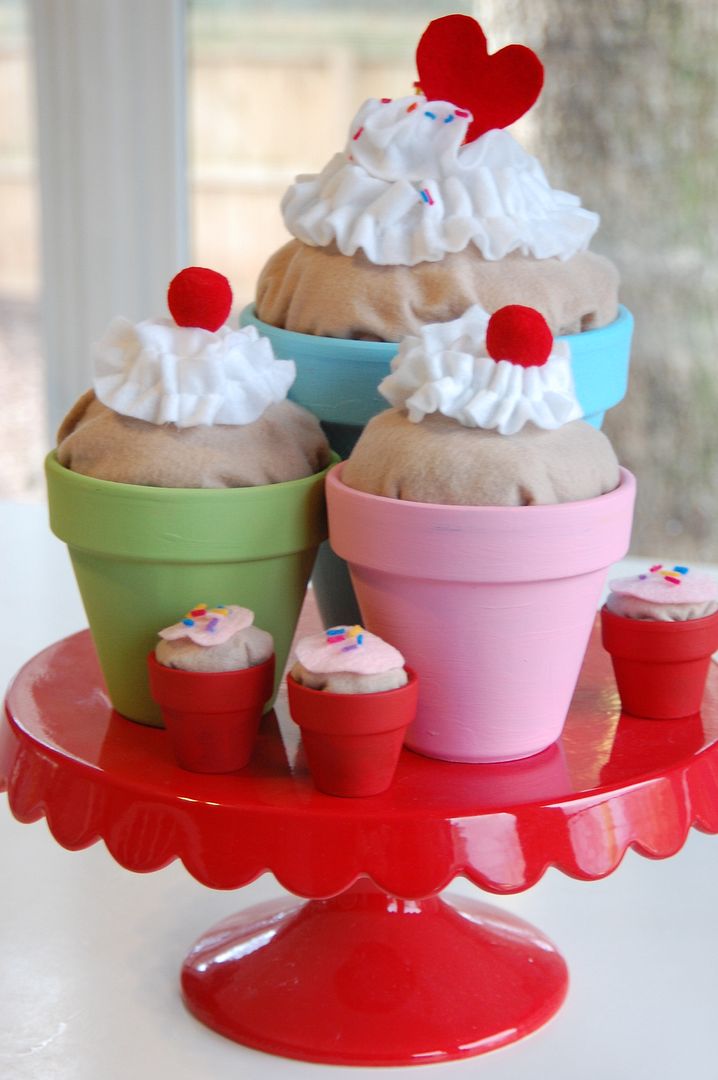
Make this for your table for your Valentines or birthday parties! Super easy and quick and use what you likely already had on hand! I didn't spend a dime on this big cupcake statement. :) What you need are some terra cotta pots, paint and felt. Also you don't need to use a sewing machine if you don't want to. You could manage this project with a tiny bit of hand sewing and glue.
To start, paint your pots the color of your choice with acrylic paints. I only needed one coat and the paint goes pretty far. I just realized that I forgot to spray them with clear acrylic when done...that would make them nice and shiny! I will go back and do that. :) Anyway, once they are nice and dry you can start to build your cupcakes.

To make the 'cake' party I used tan felt and grocery bags for filling. For the medium sized pots I used one sheet of craft felt and took several grocery sacks on top.

Then I used a rubber band to tie it all up. Now turn upside down and shove into your pot. You can now adjust, mash and smooth the felt cupcake top to your liking. The tiny pots required just 1/4 square of a felt sheet and 1/3 balled up grocery bag (I just cut off pieces of bag). The tiny pots the felt filling had to be smushed in pretty good, but worked. The large pot I didn't fool with rubber bands, but gathered a bunch of grocery bags on top of the felt and pulled the corners together and turned over and stuffed it in.
Now to make the ruffled frosting. For the large pot I cut 4 strips 1-1/2" wide the length of a piece of white craft felt. The medium pots I used 2 strips 1" wide. After sewing the strips together, I machined sewed a gathering stitch, but you could easily hand sew one. Gather and tie the thread at the end. Now swirl it on the top of your cupcakes. At this point you can tack it down with a few stitches or use glue or do nothing like I did. All the frosting and toppings I just laid on top as I plan to use these just once and will keep the pots for other uses later. But all this can be secured with hot glue or craft glue it you like. The cherries are just red craft pom poms and heart is just cut from felt. The sprinkles are some felt confetti I made with super skinny strips of felt and tiny snips at the ends. The pink frosting is just a piece of pink felt cut and laid on top.
That's all there is to it!
Now. Someone asked me about felt cupcakes. I too have always wanted to make one. I have yet to, as I never saw a tutorial for them that appealed to me. So I started brainstorming and tried to come up with my own. Before really breaking it down I googled tutorials once again and came across 2 tutorials that I love and was actually similar to what I had going on in my head. So with no further adieu, here are links to cupcake tutorial 1 and cupcake tutorial 2. :) I will be making these someday myself! Let me know if anyone makes these and how they turn out!
Tuesday, January 19, 2010
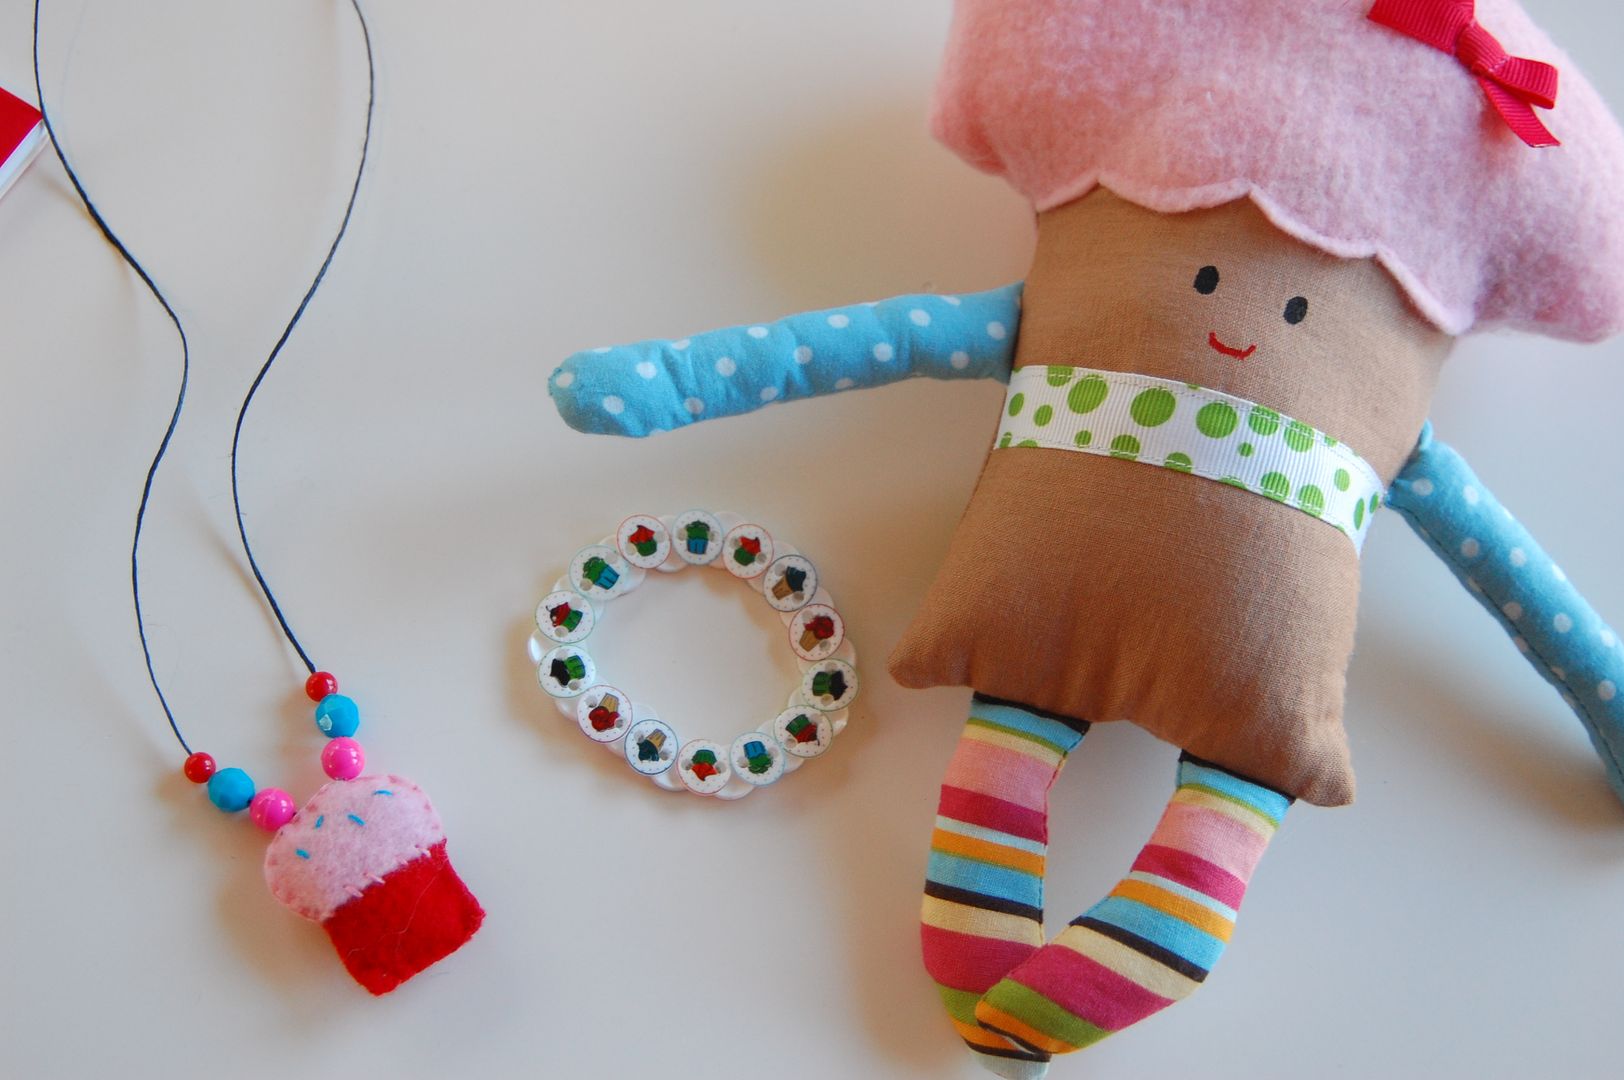
Super simple Cupcake necklace and bracelet

Simple softie cupcake pendant makes for a sweet necklace. :) Scroll down for a quick how-to to make your own. Wanna win one? Check back here Monday for a coming up SWEET! giveaway!


Ok, say you aren't the winner of said giveaway and your 3 year old would just love one of these necklaces, here's how you make your own! To start I cut out the top and bottom pieces of my cupcake. Because my fingers don't really work well in miniature...especially slippery patterns, I just cut it out free hand. Cut 2 cupcake/frosting tops and 2 bottoms. Just whittle away til you are satisfied with your cupcake pieces. Then you are going to want to slightly layer the cupcake top over the bottom and use a few tiny stitches with embroidery thread to hold them together nicely. Do this to both sides. Now make a few stitches in the frosting part to resemble sprinkles. Now use embroidery thread to stitch together the frosting tops. I made my embroidery thread down to 3 thread count by removing the other 3 threads then I used a blanket stitch all along the pink part. Then I did the same with red thread along 2 sides of the cupcake bottom leaving one side open. Then using a wood stick (used to turn tubes) to insert tiny amounts of stuffing into the cupcake til slightly plump. Then I stitched the last side together.

Then I threaded this thin bead/necklace cord onto a large embroidery needle and threaded it through the top of the cupcake. Do not try to thread it through the felt, but in between the blanket stitches on top. The cord will be then sandwiched in between the felt sides. It will slide easily at this point. I then added a few beads and tied it in a knot at the ends at a length that Miss-Change-Her-Mind-Every-2 seconds can take it off and on over her head.

And she loved it and had to wear it right that instant! :)

Now for the cuppy cake button bracelet. Remember those links I gave you on Friday? Right. I used this one and sure enough made shrinky dinks with them. Except I took it a step further and punched holes in them to make buttons. And what do I do with super cute buttons? I make bracelets of course! The above picture is how mine looked after using a regular hole punch and putting a hole on each side of the cupcake and before they were baked.

It took a little while to get all those holes punched but I made a whole page's worth. Note that if you use a regular hole punch the shrinky dink circles get a little stuck on it and you have to wiggle them off. Not a biggie, but slows ya down some. I bake my shrinky dinks on brown paper bags as recommended on package and these tiny bad boys took only 3 mins (or less).

Let cool completely before moving. *Important step: spray them with clear acrylic spray to seal the images...otherwise if they get wet, they smear and come off! Let dry completely.
Then you have all these precious little buttons. You could have lots of fun with them with all kinds of different ideas. To make a bracelet you need some stretchy bracelet elastic. This stuff is strong and ties into tiny little knots that kind of disappear.

I made this a double sided bracelet so you don't have to fool with twisting and turning and not seeing the adorable little cupcakes. To do this, take your first button and thread the elastic DOWN the left hole. Now flip it over and take another button and thread the elastic DOWN the left hole and straight into the back of the first button in it's right hole. Flip over and repeat all along bracelet. See the end of the bracelet...that elastic coming up will now go down into the next button's left hole and into the bottom button's right hole.

For Maressa's toddler sized bracelet I used a total of 28 buttons. When you get to the end, take your first button and pull the elastic out of the left hole and connect it with the end button using the elastic on the end part and tie securely in a knot.

Now make your cupcake smile when you give it to her!
Monday, January 18, 2010
Sweet- tees
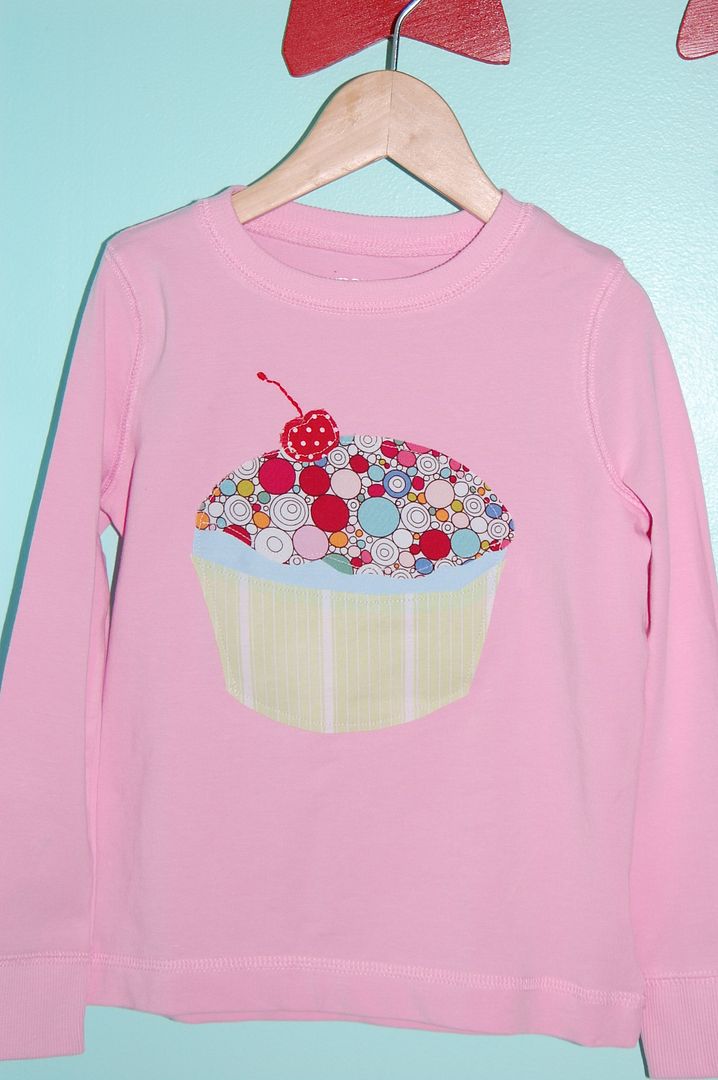
First up for Cupcake Week is a sweet cupcake applique tee. I made this of course for Maressa to wear for her party and Valentines Day and such. Next week I hope to make the matching skirt and finally do my bubble skirt tutorial.

To make your own cupcake tee like this one first print this page. I used the cupcake from it to make my cupcake pattern. Then turn the page over and used a sharpie or marker to trace the different parts. I also added a cherry for the top. Now take your wonder under lite and use a pen or pencil to trace each section. I made the top of the cupcake in layers. The blue under layer I traced it down farther than the cupcake wrapper part so I could layer the green fabric over it. So I made 4 separate tracings of each part.
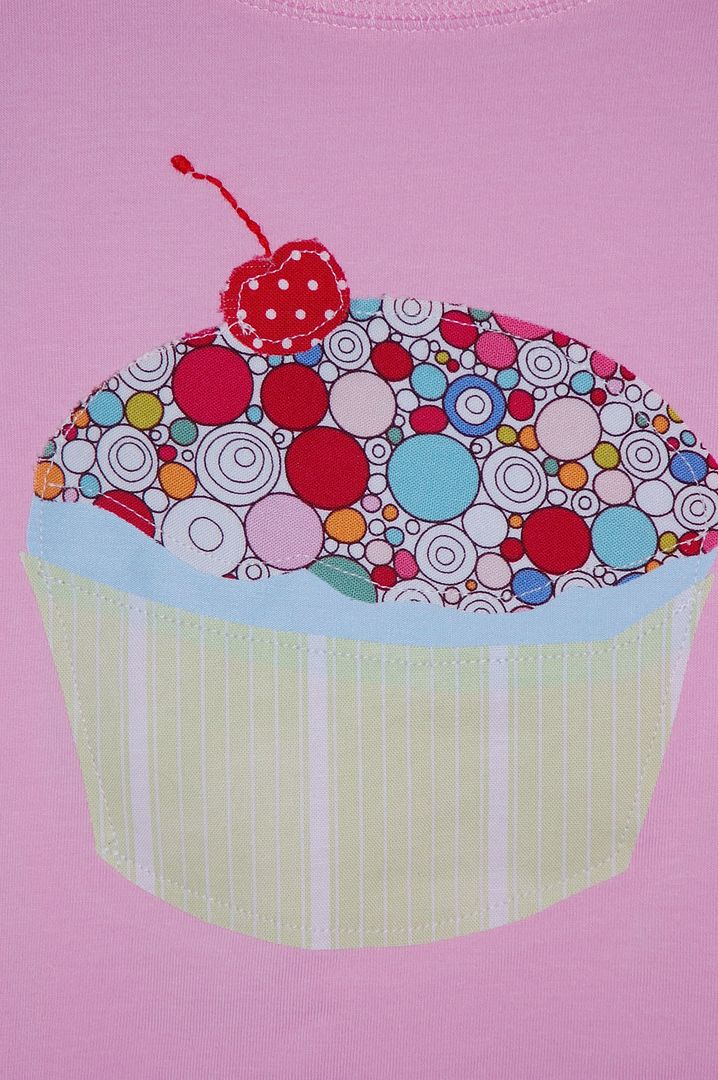
Then I ironed the green slightly over the blue matching the top edges. Then the dots on top and finally the cherry. I topstitched it all down then embroidered the cherry stem with a knot at the top of it. Here I talk about some resources for embroidery stitches if you don't know how.

While I had the wonder under out I made Kalla a heart tee. I was planning on doing the same as last year's, but decided to make it a little different. I used this very sweet candy printed fabric I had leftover from Kalla's '6' shirt for the smaller heart. For the hearts I just drew them. If you are looking for a pattern to use I mention some here. :) Then I just embroidered the 'Sweetie' on top. First I wrote the word with water soluble marker then used a backstitch to embroider the letters.

Come back tomorrow for the next cupcake craft! And a SWEET giveaway coming up soon! :)
Friday, January 15, 2010
Cupcakes, Cupcakes, Cupcakes!

Well in all this cupcake brainstorming, I remembered a very lovely cupcake week done by another blogger last year. So of course I had to go dig those posts up. So here are some very yummy cupcake printable goodies! And look for some of them in my upcoming crafts!
via LollyChops:
Cupcake party invites ~ though I've already pulled out stuff to make my own, thinking I will use these instead and save myself some time!
Cupcakes tags, paper buttons and/or shrinky dinks
Cupcake embroidery ~ which I'm using them for something different all together! ;)
Thursday, January 14, 2010
Coconut Pineapple Loaf

I was asked to contribute some quick bread loaves for a little send off breakfast for some missionaries at our church this past week. I wanted to try something different than just banana bread, so of course I turned to the MS site for recipes. This one did not disappoint! I followed this recipe here exactly, except I sliced all my pineapple chunks in half. Also for me this made 2 loaves with one recipe...which was perfect...one to take and one to keep all to myself at home! ;)
Wednesday, January 13, 2010
Doll Love
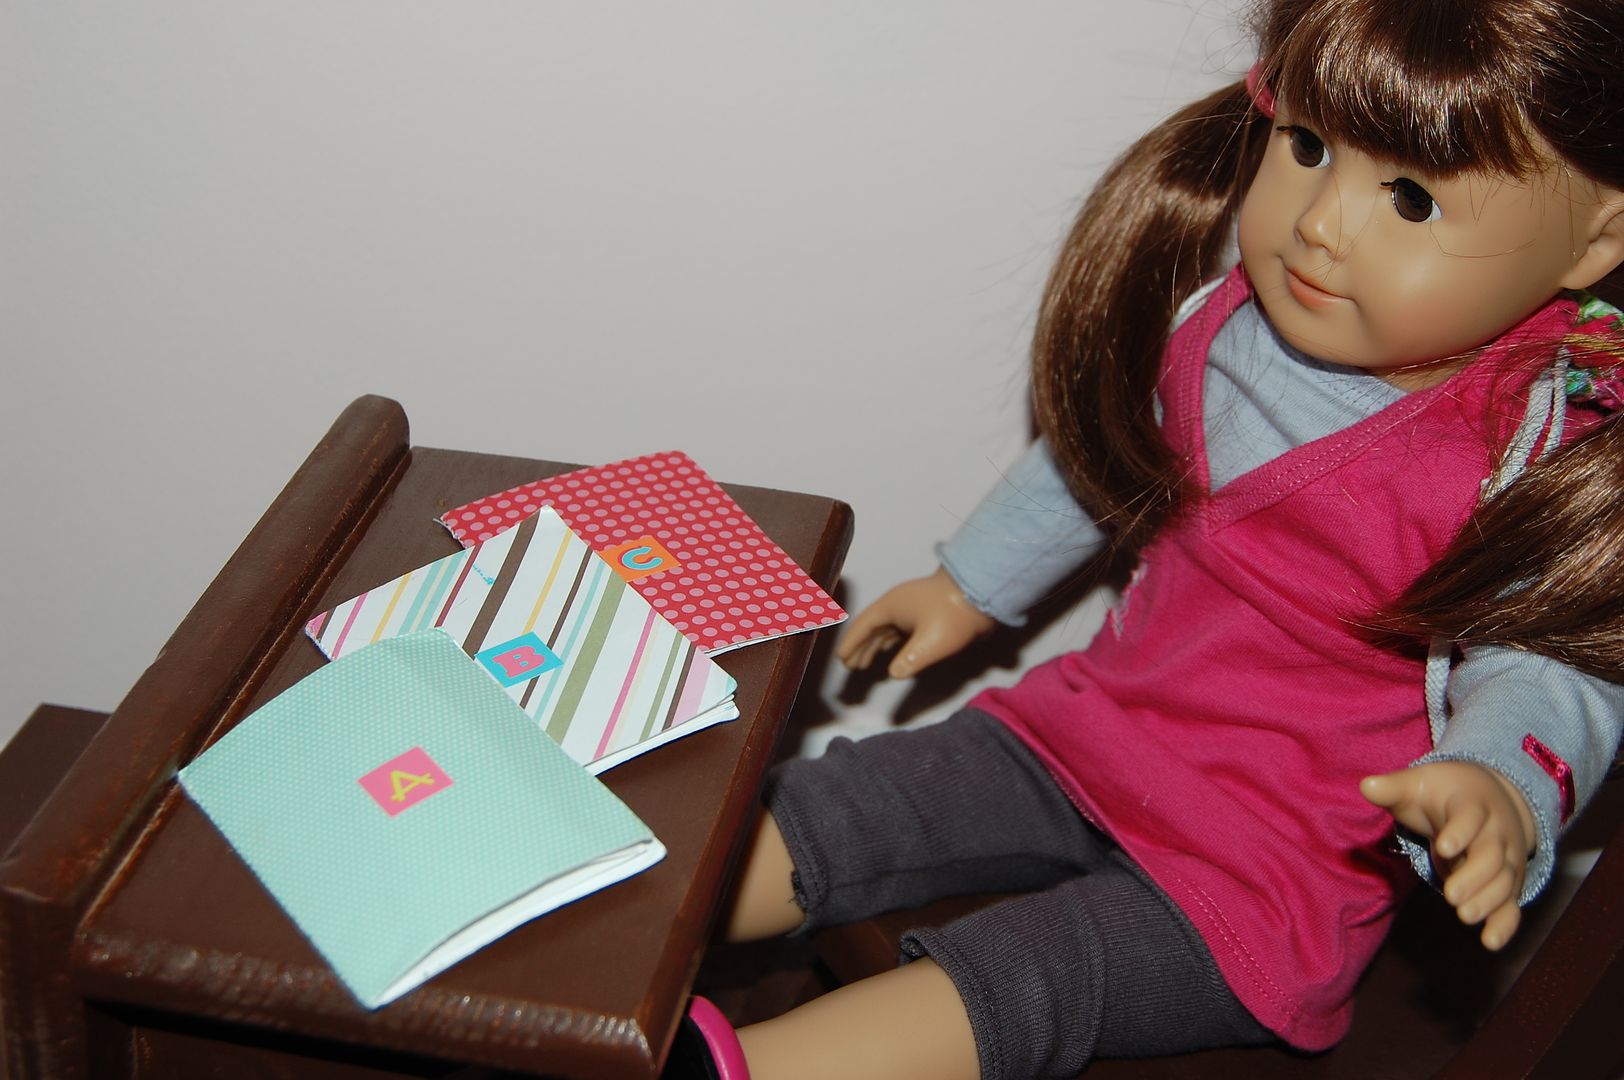
Kalla got an American Girl doll for Christmas. I was a little hesitant on getting her one, namely because of the price and wasn't sure if she truly would love her. She got a Bitty Baby last year and hardly touches it. Another problem, was the cost of the doll alone is about how much I aim at spending total on each kid at Christmas, but I still want them to have the same number of gifts to open. But things came together. I was making her the wooden dolls already, and the above desk and chair set was given to me by a friend who got them free at a garage sale. And then I made a few 'starter' accessories to go with her doll. Kalla is in kindergarten and they use a reading system that starts with 'letter books' which K adores. So I made her doll some tiny letter books of her own with card stock. Inside I put stickers of pictures of things starting with said letter.

I also made a tiny backpack. Here is a great tutorial for these type drawstring backpacks, and I just cut the fabric much smaller. I used these measurements: 14.5"x7". And instead of grommets I sewed a small ribbon lope into the bottom corner hem.
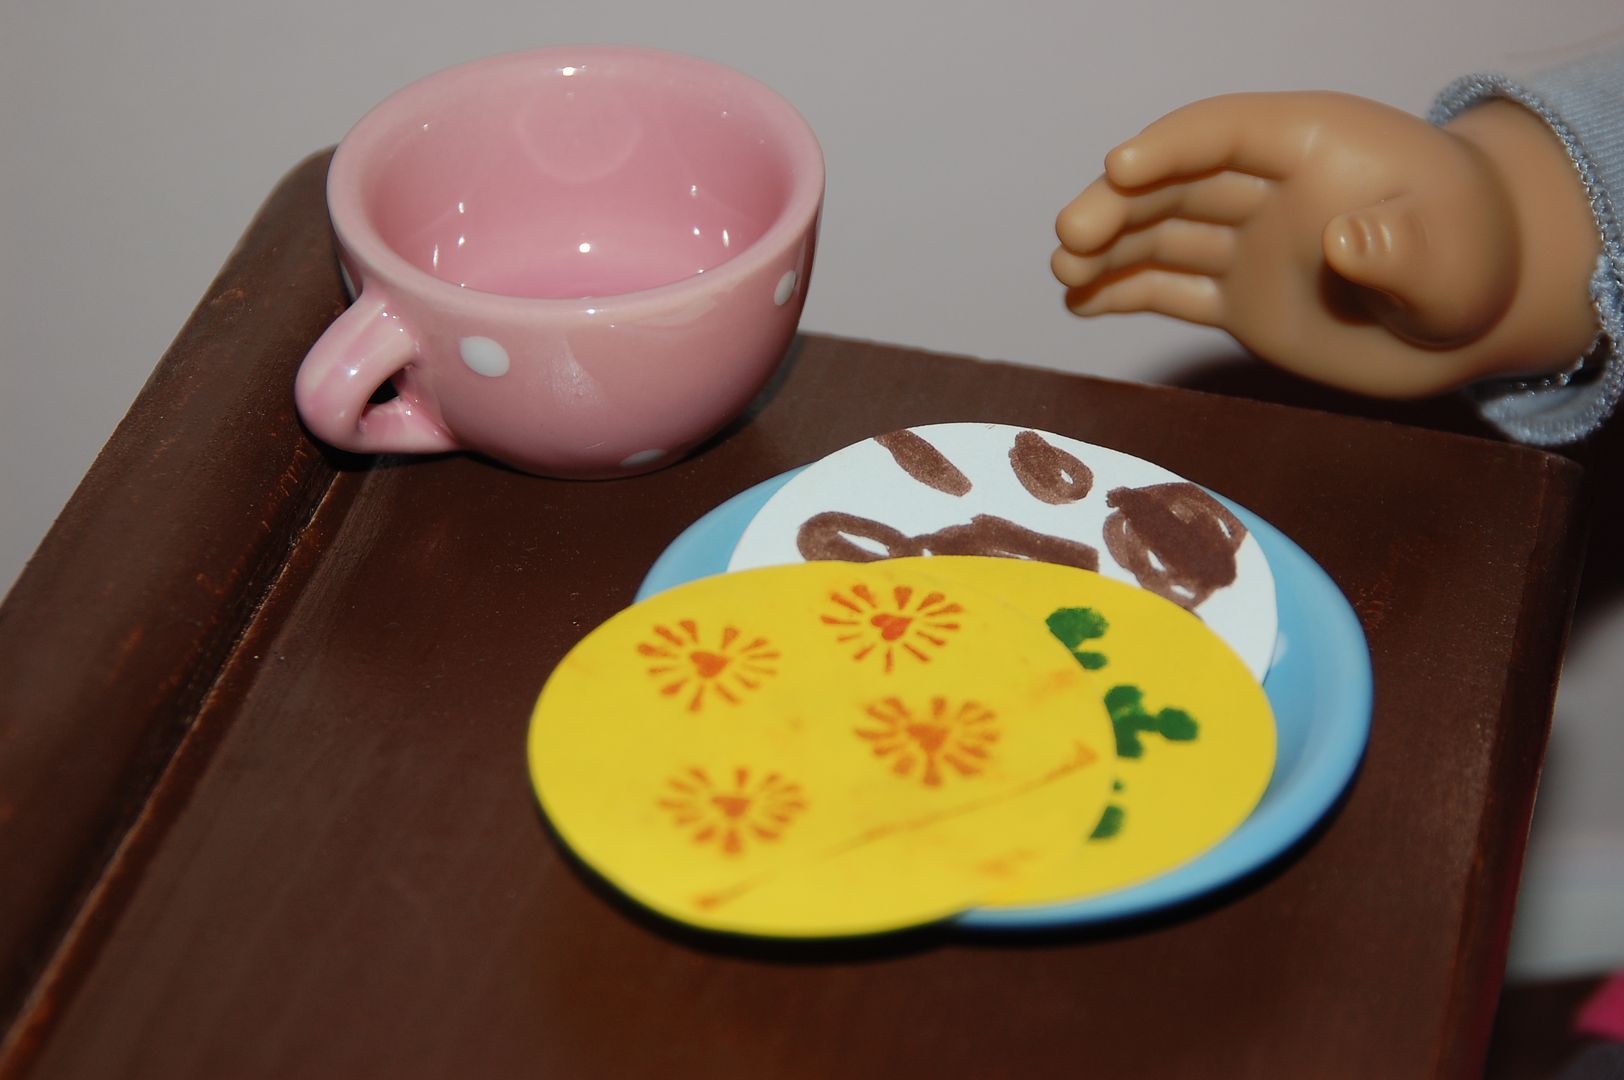
She loves this doll so much! Worth every penny! She takes her everywhere. For the holidays we went to see my mom and sister who has 3 kids. Kalla's cousin Elizabeth is 13 and used to love AG dolls as well. So she was so sweet and got out all her stuff in storage and played and played with her. They made stuff for the dolls as well. Kalla brought home the paper cookies they made for the dolls to keep.
Now to make the doll some clothes I just ordered AG sized doll clothes patterns on eBay and we are first going to make some pjs. We have the fabric picked out. Now I just need to cut it out and we are going to sew them together. She is also anxious to make the little camp fire craft in the book that came with her and we will make a sleeping bag as well. So there will be plenty of crafting for her doll to come this year and I will post them all here! ;)
Tuesday, January 12, 2010
Cupcake Bites

The cupcakes are simply a white cake mix with 3/4 tsp of almond flavoring added. Then I made the following frosting:
Almond Buttercream Frosting
1/2 C butter softened
1/2 C shortening
4 C powdered sugar
1/2 tsp vanilla
1/2 tsp almond extract
2 tbsp milk (add more if needed to get texture desired...I always add more)
Cream butter and shortening. Carefully add sugar. Then mix in extracts and milk.
I then put it in a large ziplock bag and cut a hole in the corner and just squeezed it out onto each cupcake. To make the coconut, simply toast it in oven on 200F stirring and watching carefully until all is slightly brown. Careful...it can burn easily! I'm so making larger coconut cupcakes for the adults at Maressa's coming up party! YUM!
Monday, January 11, 2010
A Very Inexpensive Simple Dog Mat
This past week even the deep south was frozen solid! We had single digit temps at night. Brrrr!
We have 2 dogs and a cat that live outside. They however have a doggy door to the garage where they occupy an enclosed space for shelter. So even though they were out of the elements when they so chose, it just seemed awfully cold to have to sleep on a cement floor.
So I went looking for reasonably priced dog beds/mats for our 2 large dogs. Well after scouring Target and Petsmart, that just did not happen. See the problem is in the past our dogs have destroyed any type of beds we have bought them. Laying out an old blanket is a joke too. If they don't get it all scrunched up first, unable to lay on it, then they drag it out into the yards and tear it into a bunch of tiny pieces.
So feeling a little discouraged not finding something that wouldn't cost much in case they do destroy it, I had an idea.

I went to Walgreens and found these fleece throws for $1.99 each. I bought 4. I took them home and folded them in half width-wise and cut along fold.

Then I layered 2 pieces, then a piece of quilting batting I had on hand, then 2 more pieces.
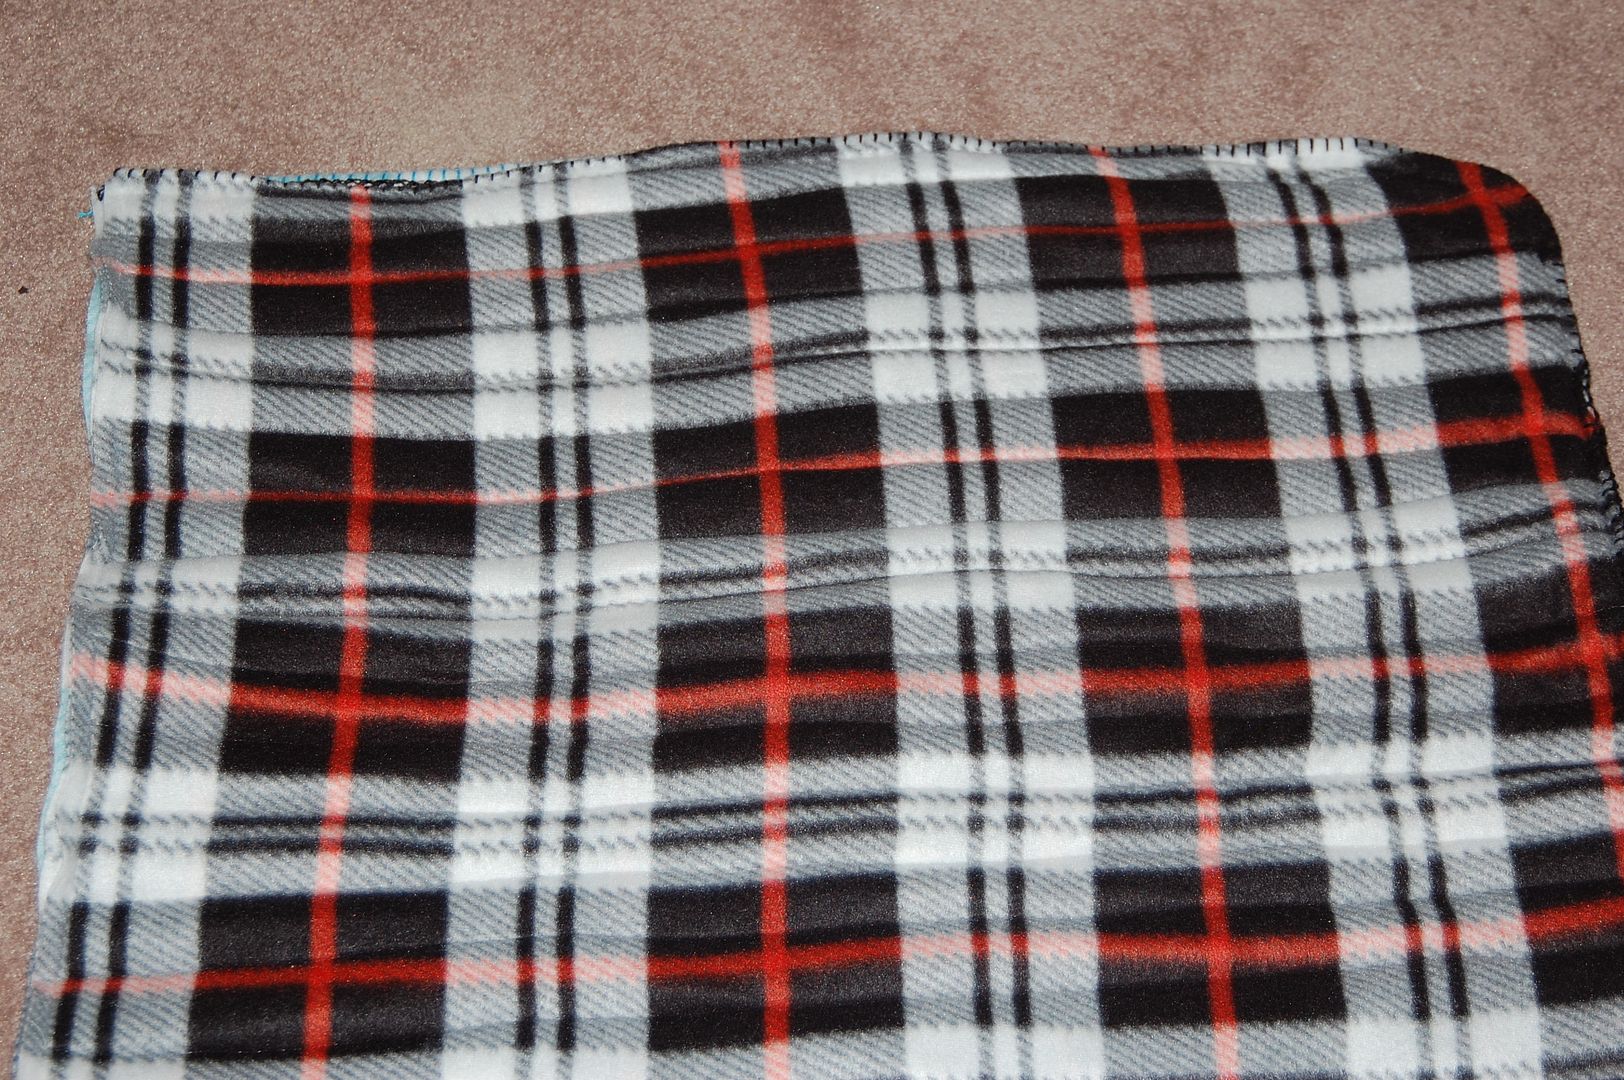
Then I sewed all along the sides, then on top along the width every few inches.
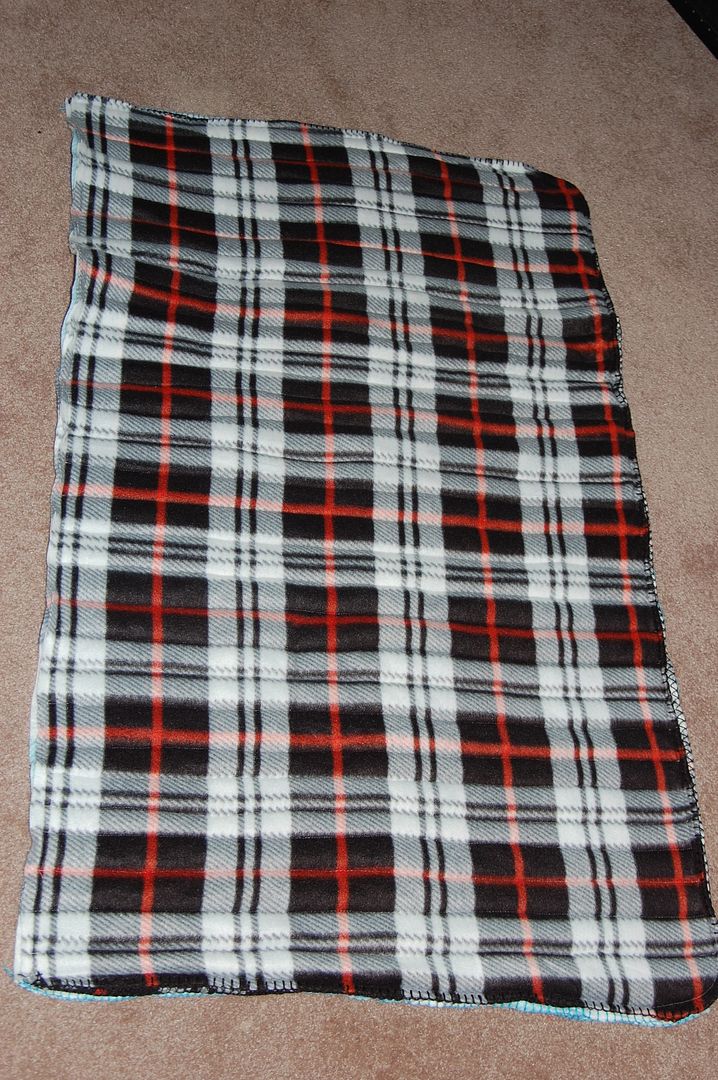
This made a nice thick extra large pad for my dogs. Oh yeah, the cat sleeps on it with them too. :)
They are not pretty, but serve a great purpose!
The best part is since it is 'quilted' and kind of thick, it doesn't bunch up too easily and they have actually NOT chewed it up...course they are getting old. ;)
Saturday, January 9, 2010
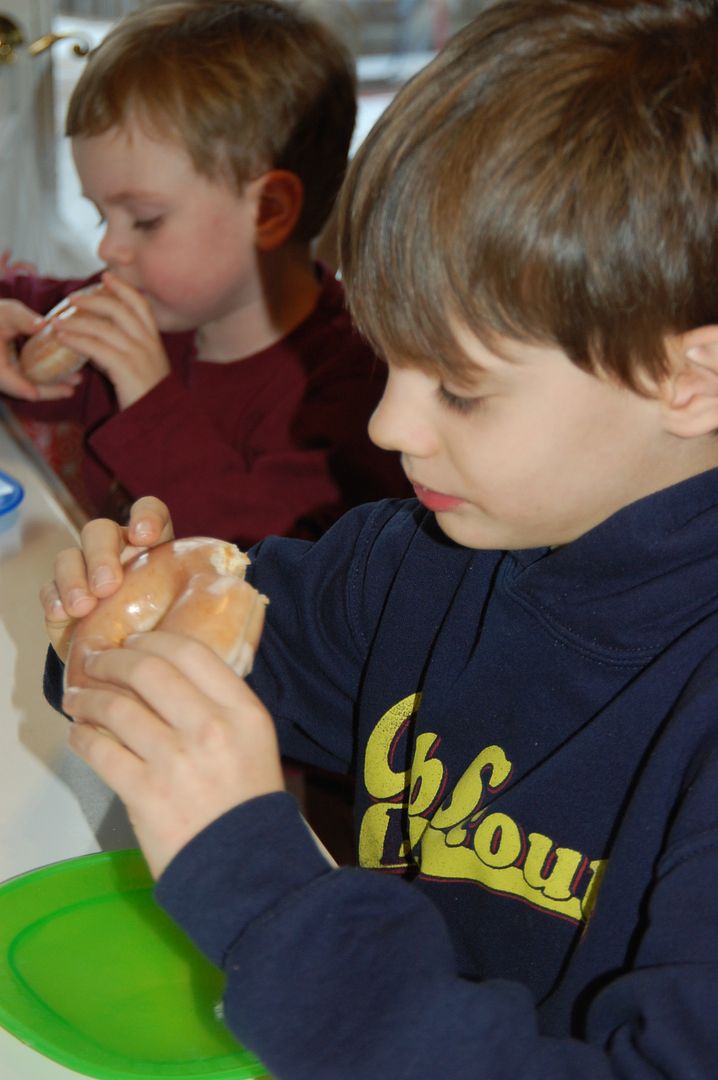
Doughnuts!
Did you know that you can get a free doughnut from Krispie Kreme for every A on your kid's report card?
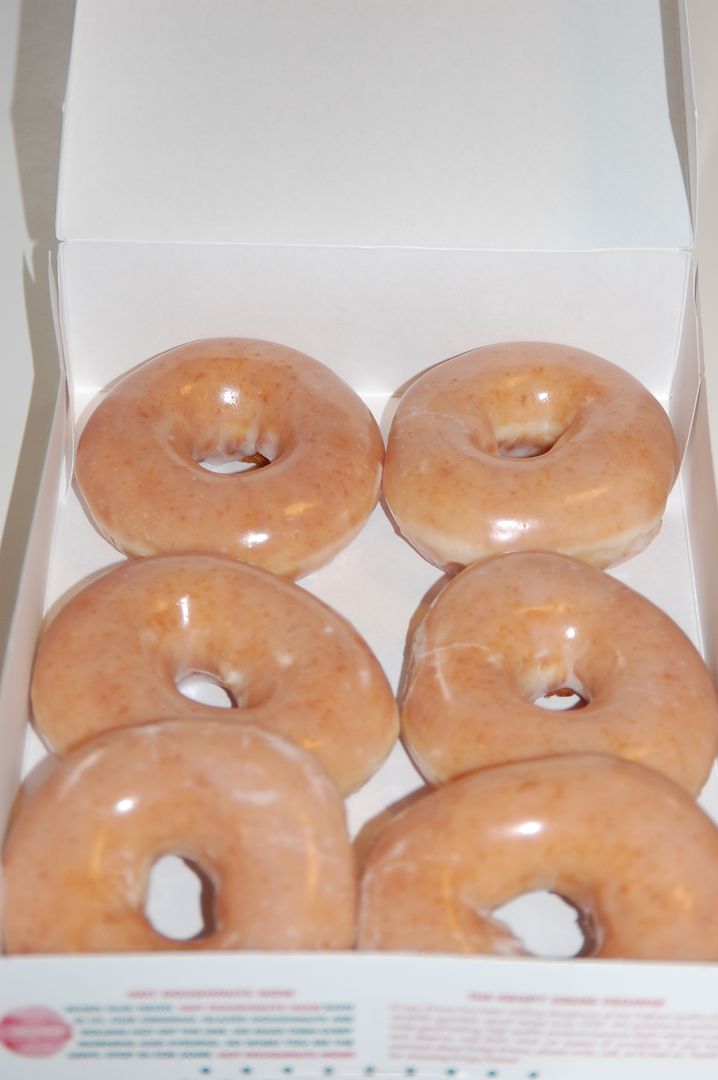
Zachary is sweet enough to share with all of us! Mmmmmm!
Friday, January 8, 2010
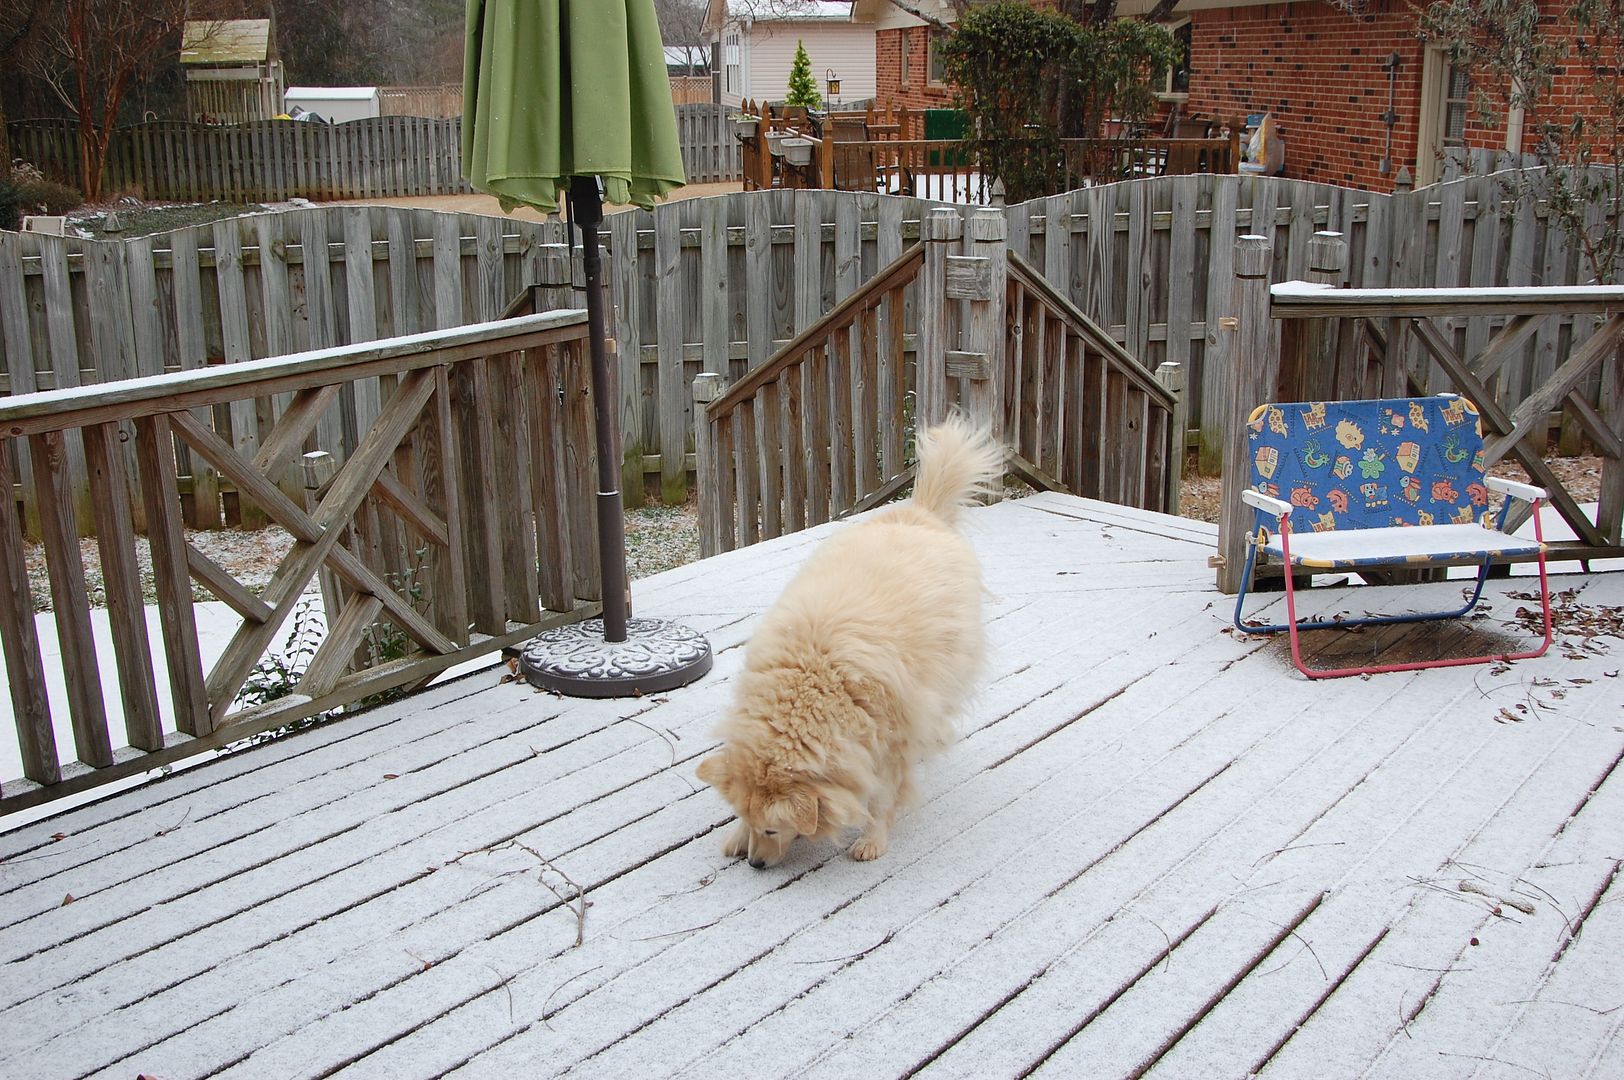
Alabama Snow Day

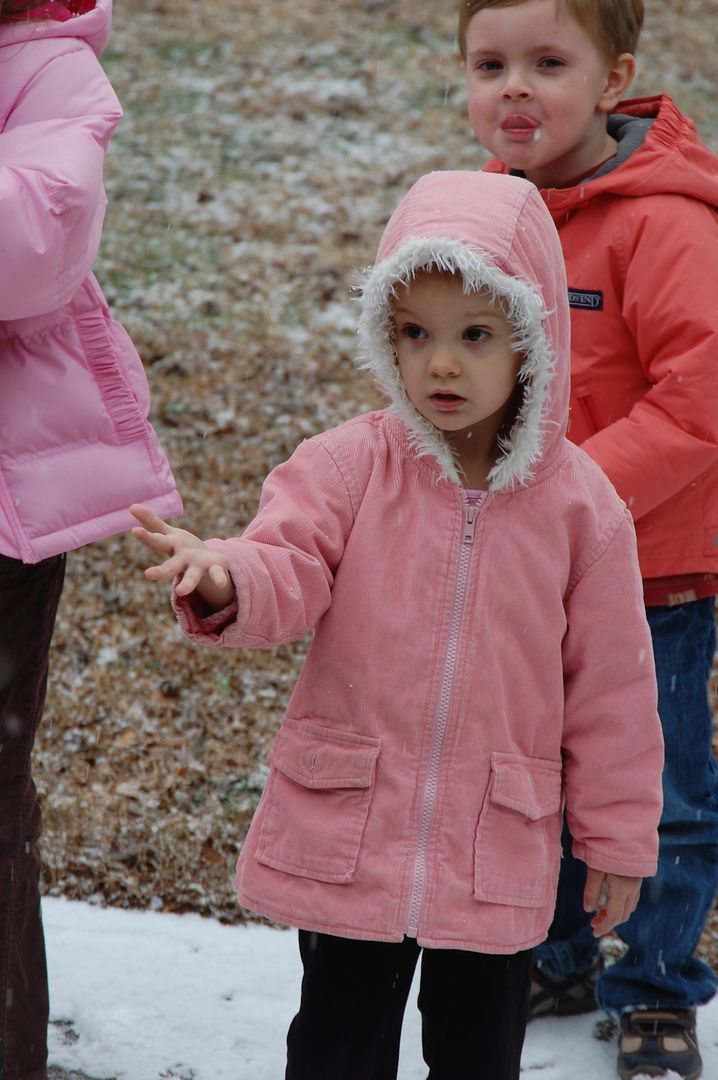
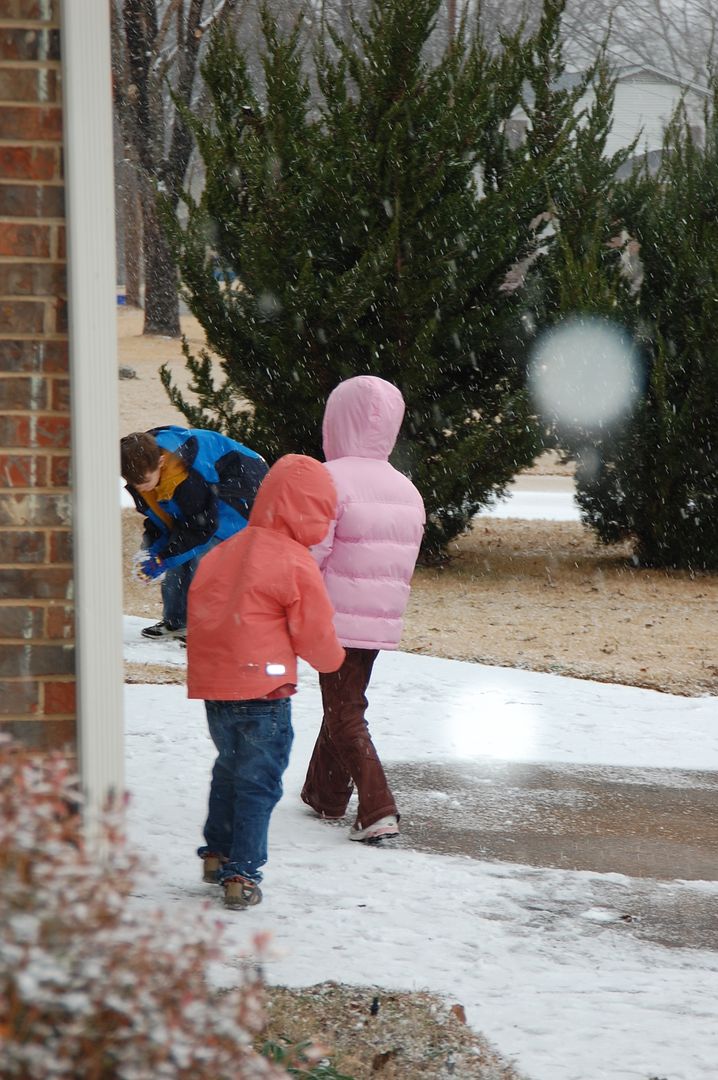
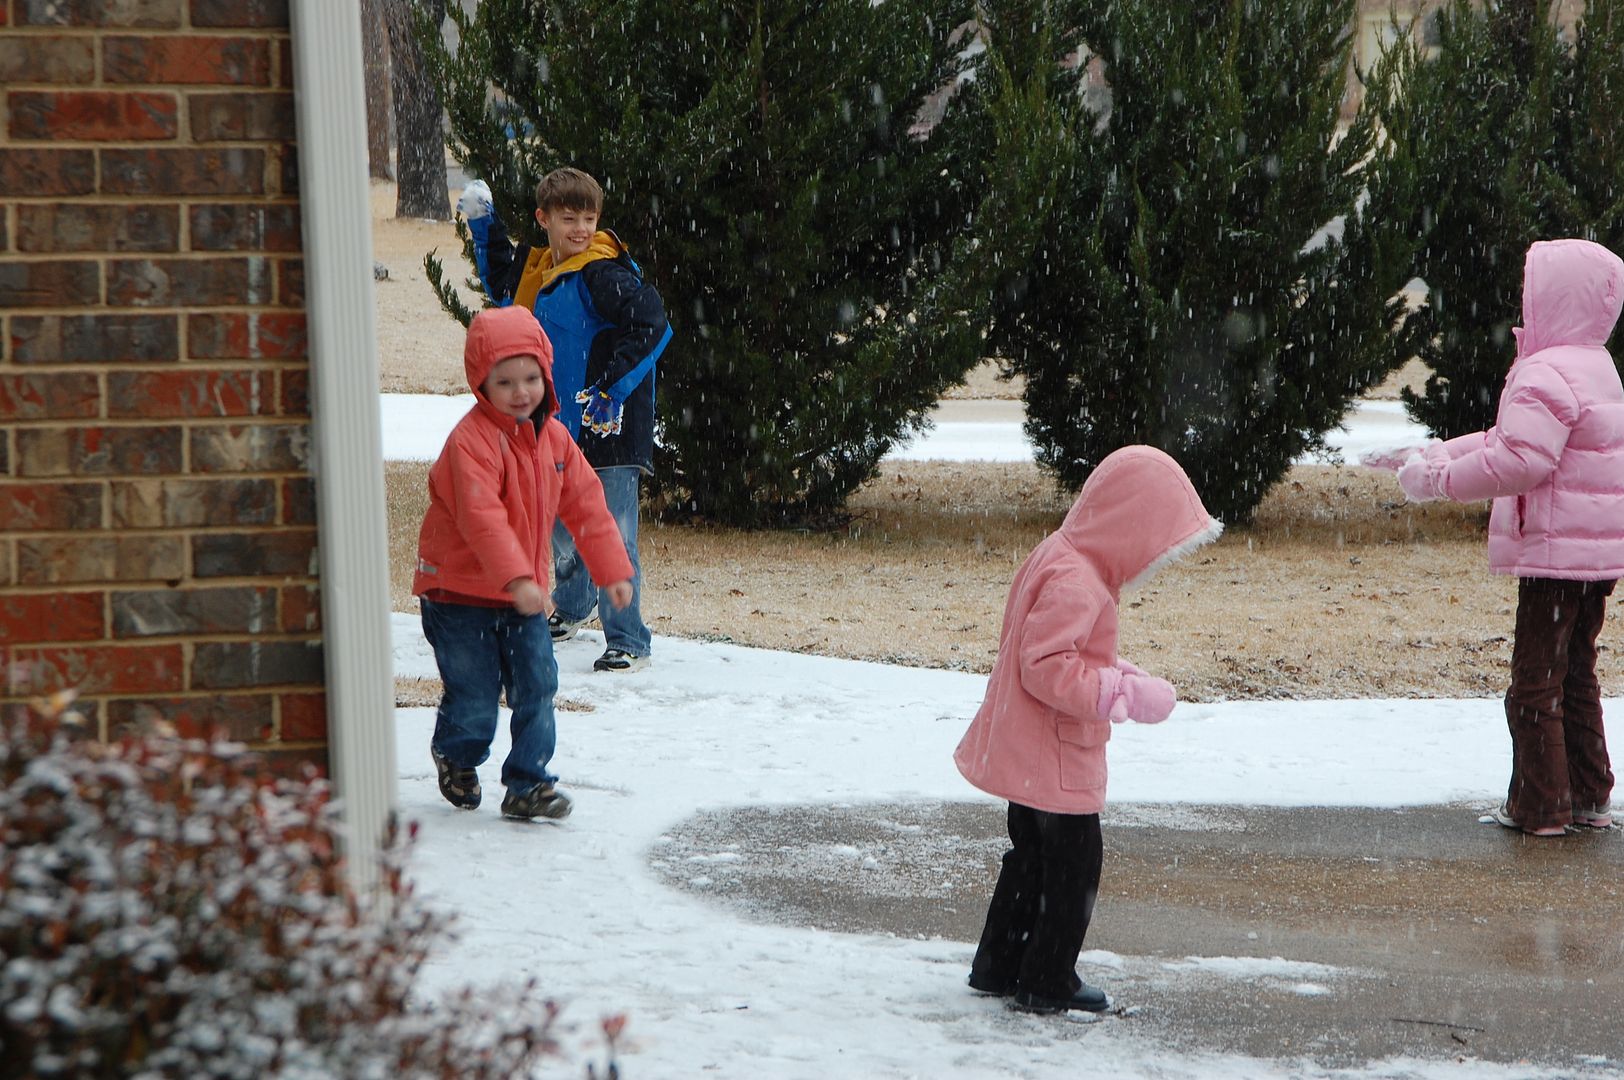

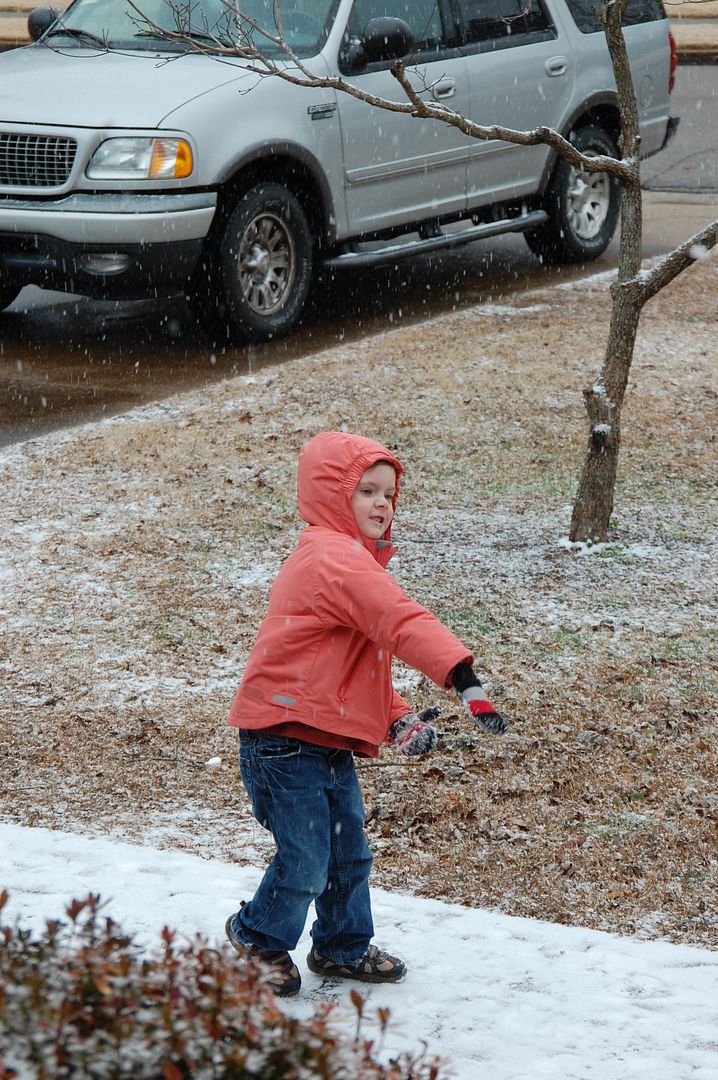
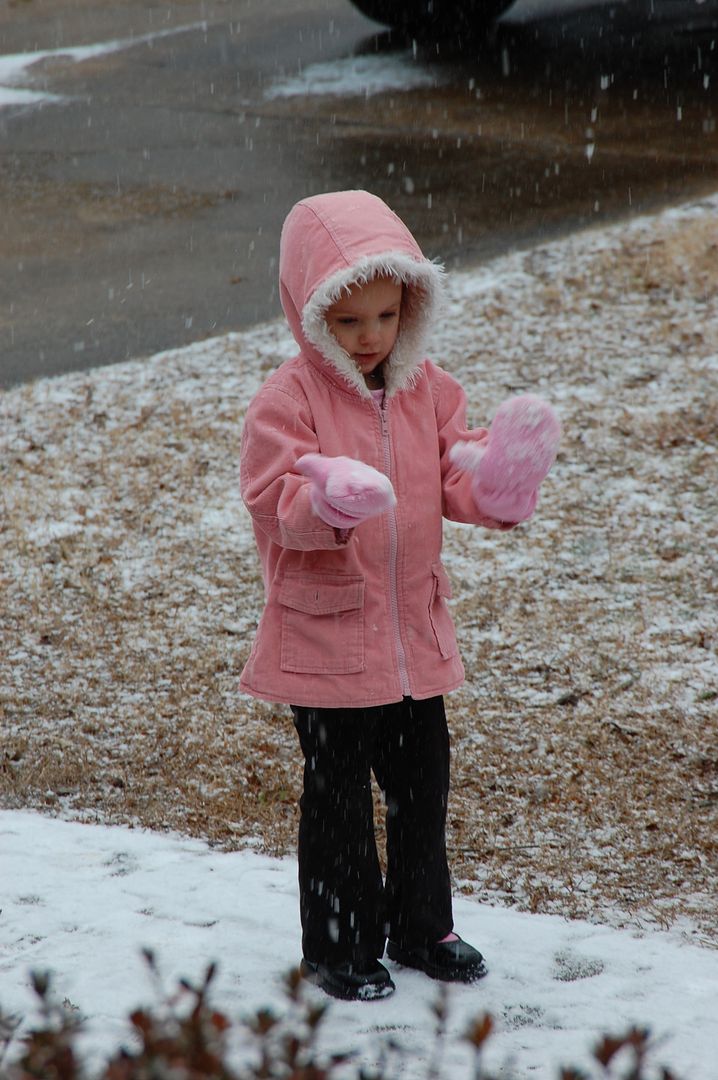

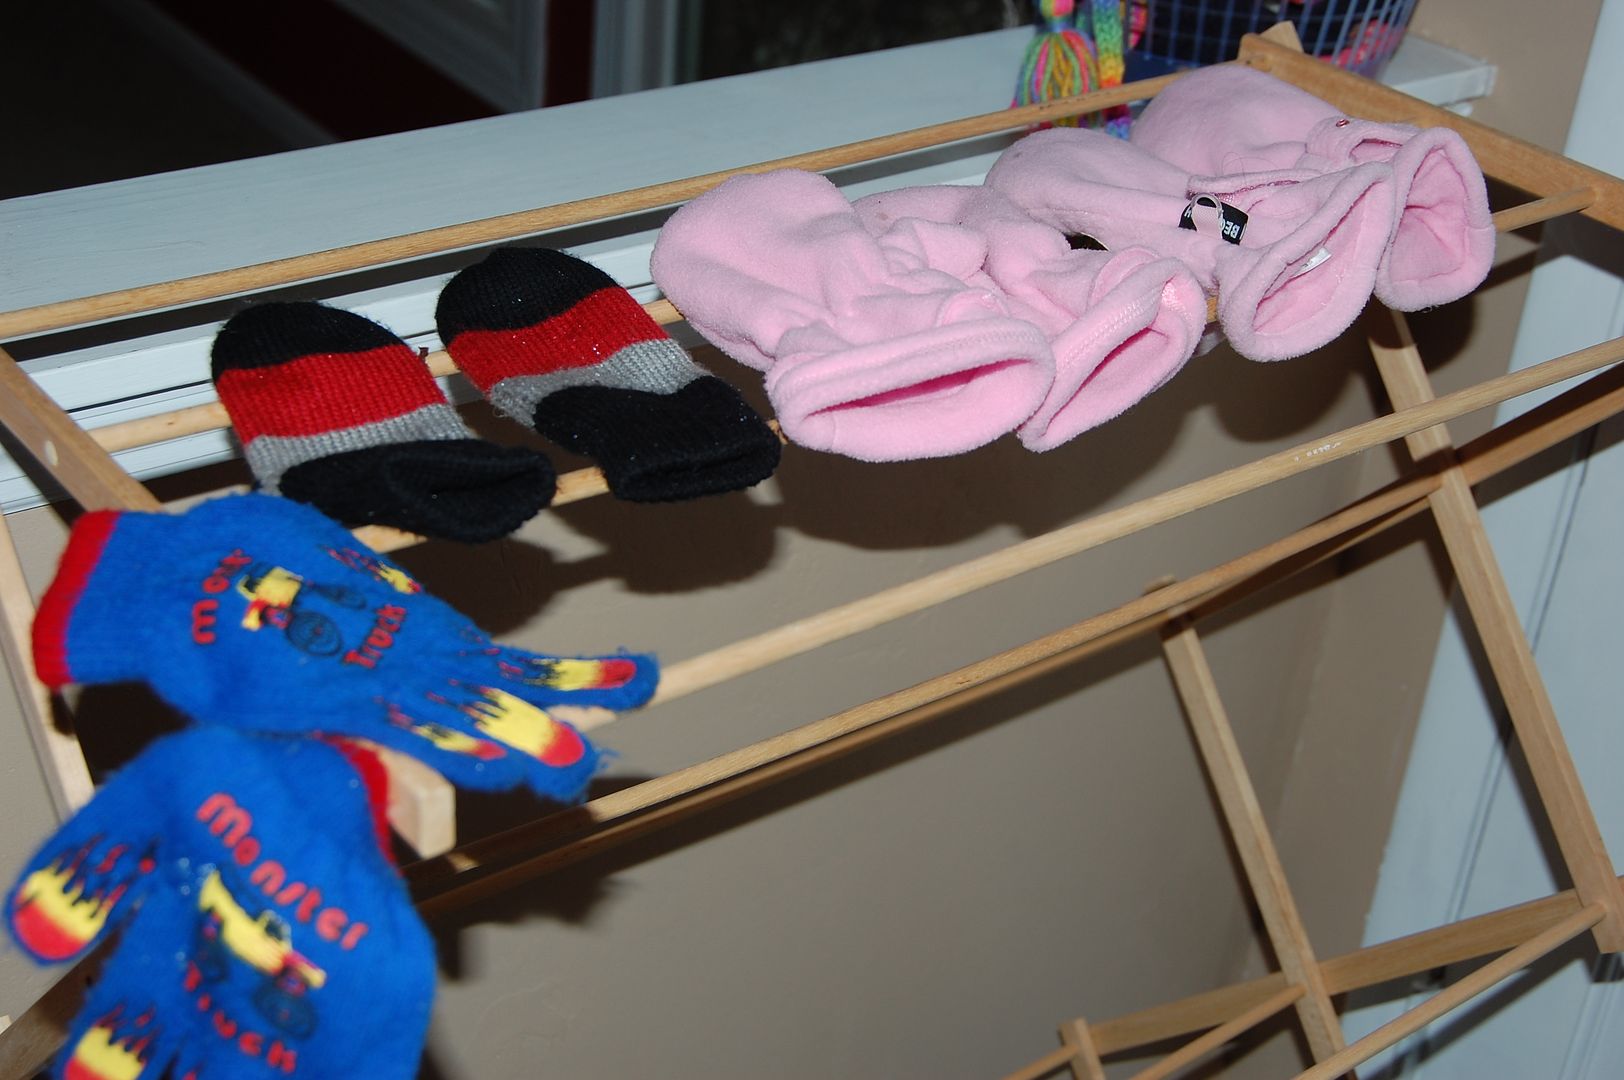
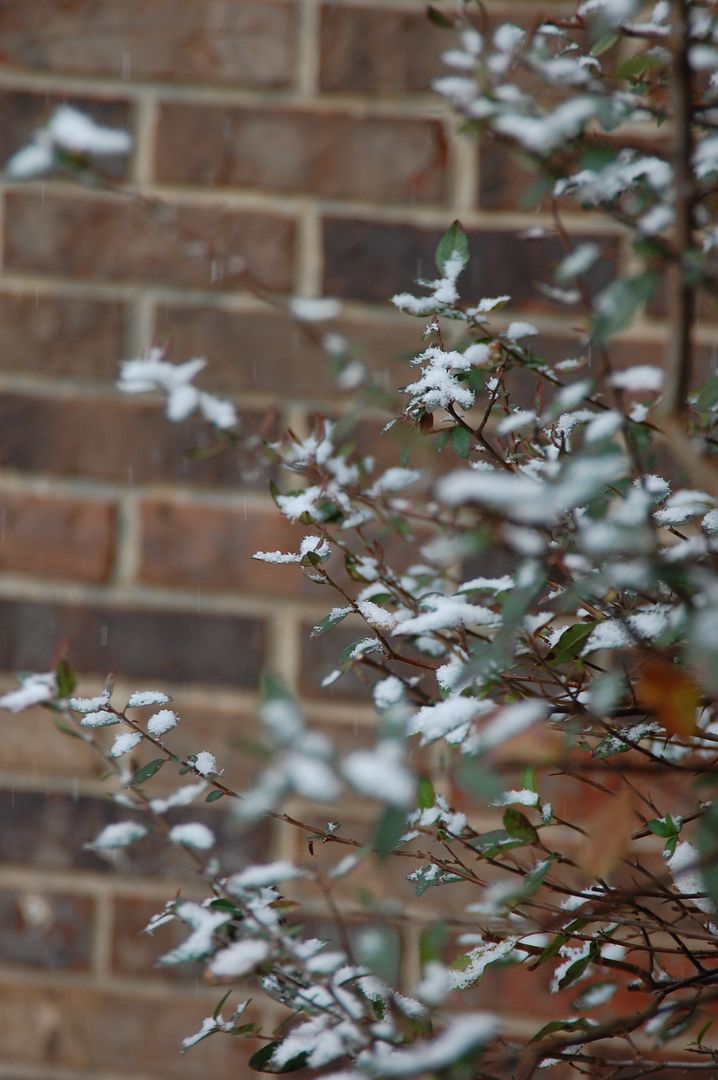
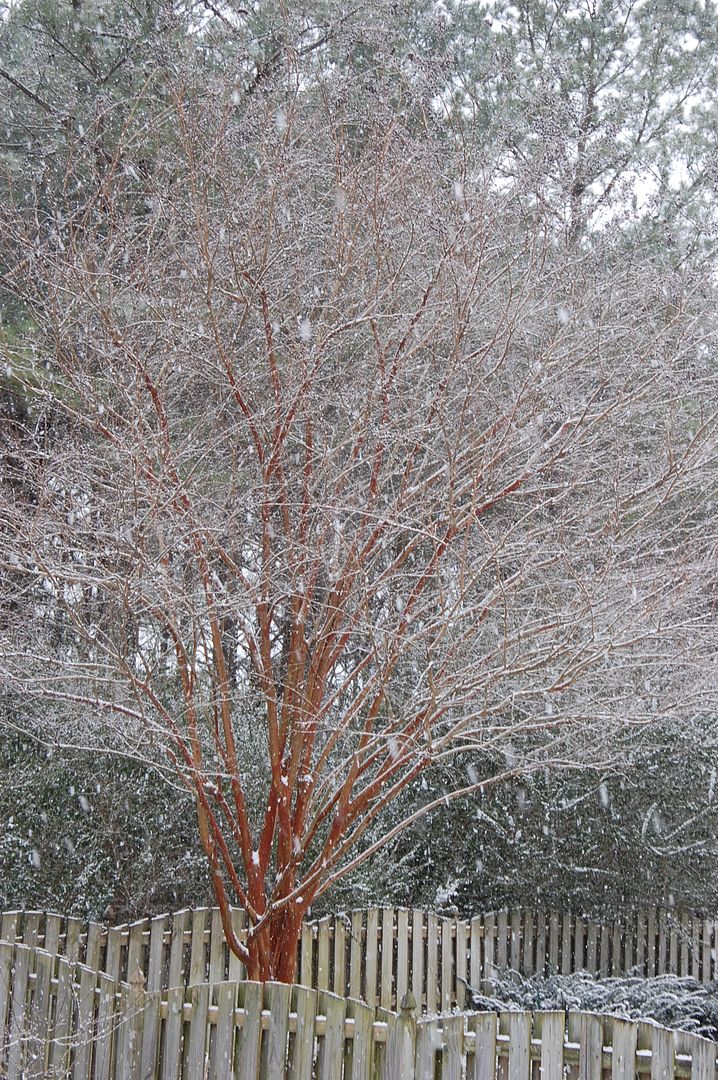
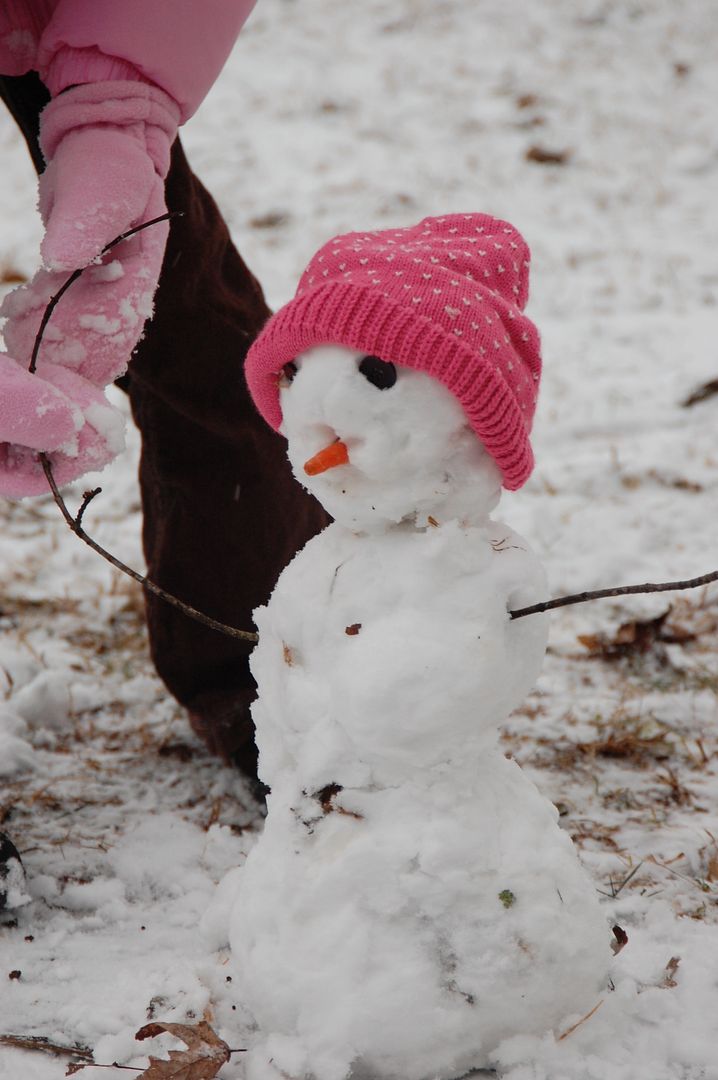

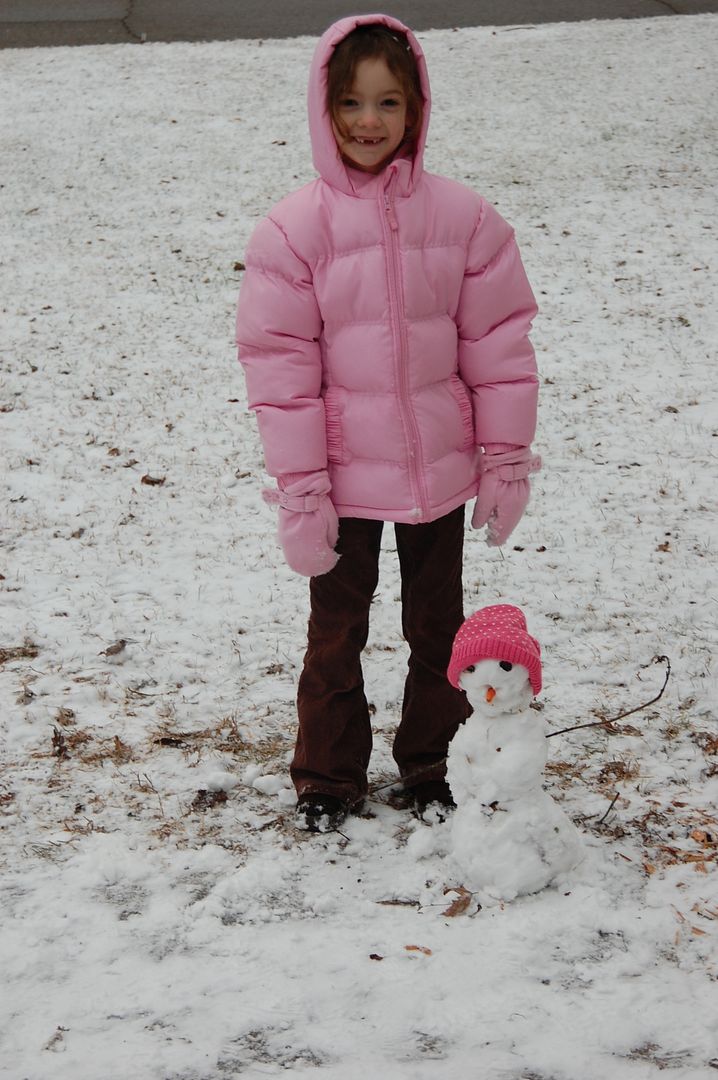
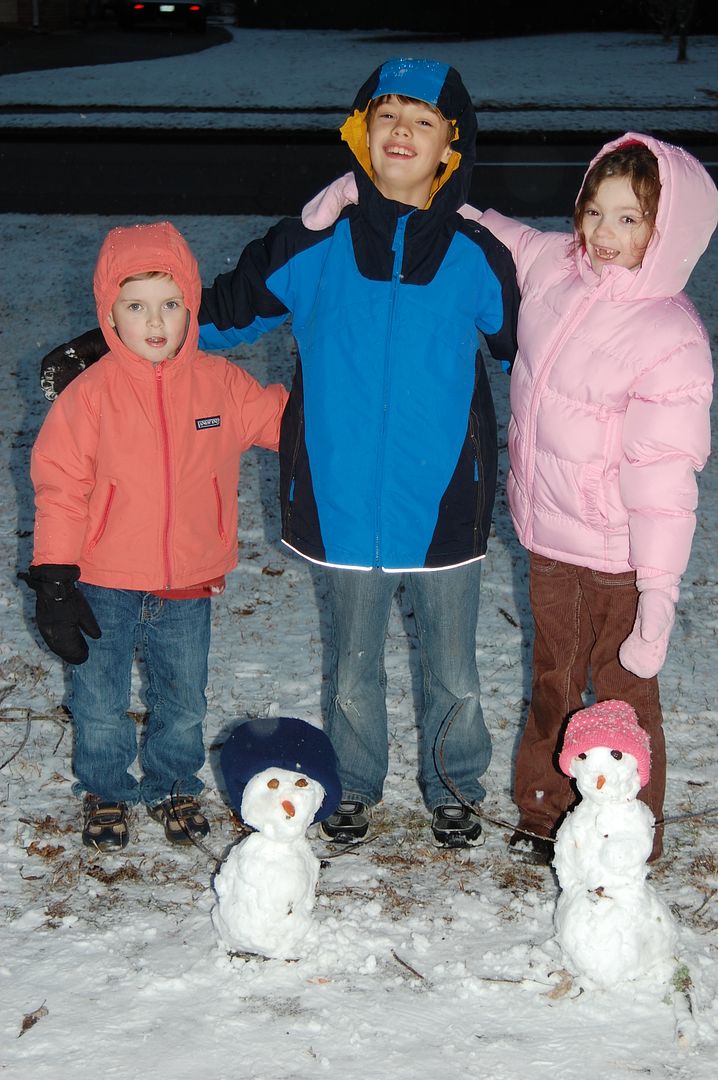
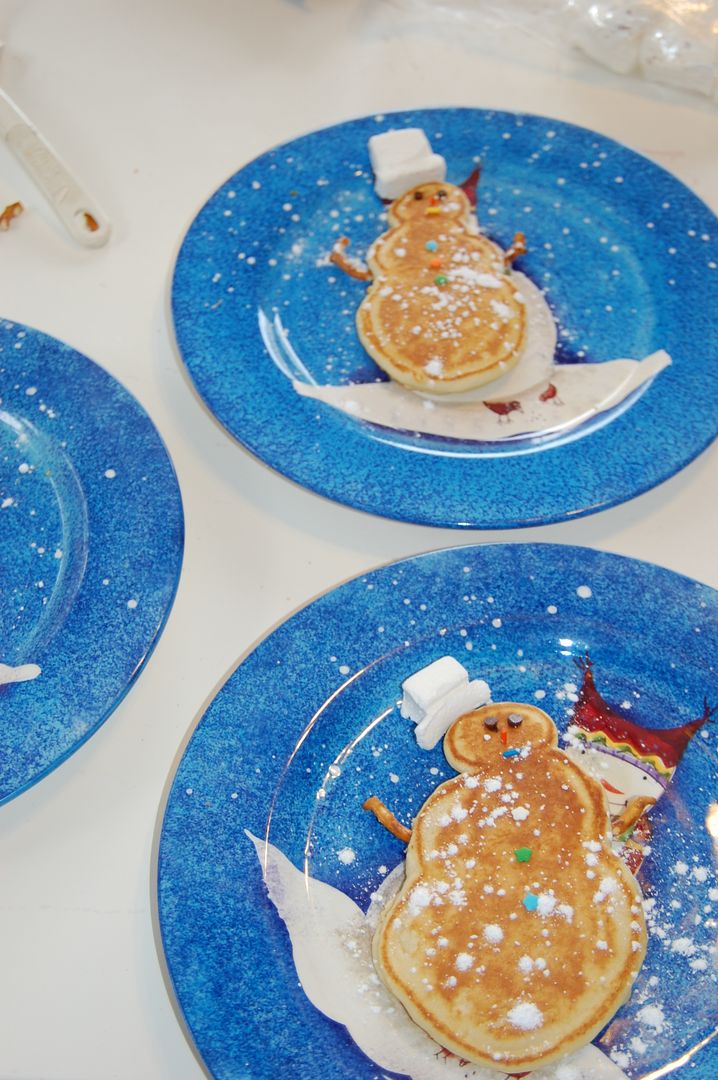
This was the first snow that we've had since having kids here that they were truly able to play in it. It still was not quite enough to make a snow angel or make some snow cream (when I was a kid we always colored our snow cream pink). But we made snow 'babies' and had snow ball fights and the boys played football in the snow with daddy (my camera battery died before that, plus it was twilight and would of been really dark pics). It was a perfect day for playing in it at 33F and big flakes falling down off and on and no wind. Today on the other hand while beautiful outside with snow flurries most of the day is a bone chilling 19F and 'feels like' 8F. Sorry kids, we just don't own proper clothing to hang out in that kind of weather very long. So to make up for it, I made yummy snowman pancakes for breakfast. :)
Subscribe to:
Posts (Atom)