Tuesday, December 20, 2011

Easy globe ornament

We made these fun ornaments in a couple of the kids holiday parties at school.
I was inspired by this one on Parents.com, and changed it up a tiny bit.

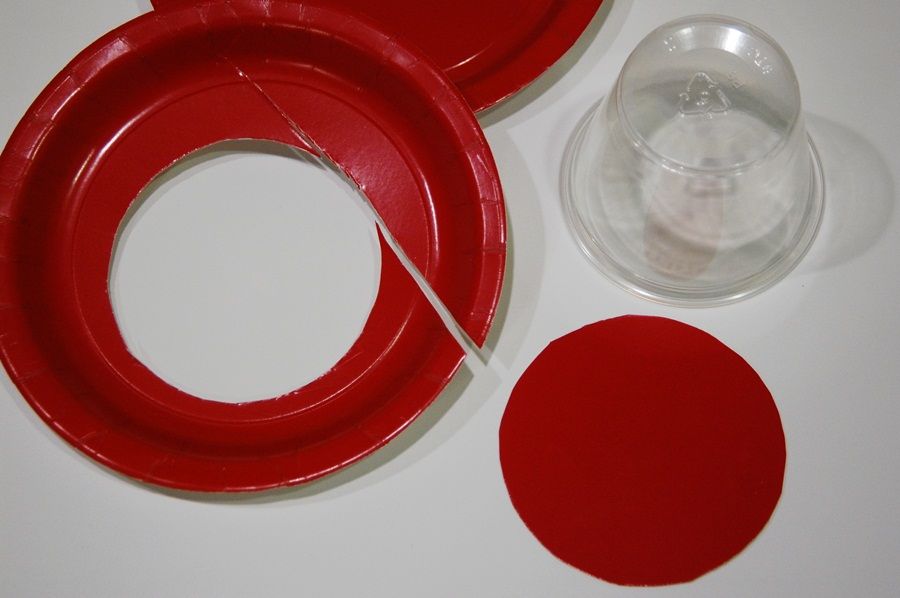
I used small paper plates and clear punch cups.
I traced the cups on the plates and cut out the circles.
Then used glue dots or hot glue to adhere the miniatures to the plate.
You can use any tiny miniatures.
I had these trees on hand and tiny reindeer and ballerinas I had used once on cupcakes.
I even used some snowman cupcake picks and just broke off the pick part.
After the miniatures are secure, we used craft glue around the edge of the plate.
Using a sharp needle, I threaded bakers twine in the top of the plastic cup.
Then I placed a small handful of plastic fake snow in the cups.
Then I placed the plate with glue on top of the cup.
Let the glue set.
Then turn it right side up.
If you want to add a pipe cleaner trim, put glue around the outside edge of the cup.
Regular pipe cleaners are just the right size.
Put ends together and over lap just a tiny bit and twist together forming a circle.
Place circle over the cup and push to the bottom onto the glue.
The most fun is you can shake it and the loose snow moves around.
Maressa's 4 yr old class and Micah's first grade class loved making these!

Wednesday, December 14, 2011

Christmas Cowboy Cookies

I've heard of the cowboy cookie before, but never made them.
Intrigued by the hearty ingredients, I finally decided to try them.
We had a church thing this past Sunday of which I volunteered to make cookies for kids for after we went caroling so this was a perfect opportunity to bake them.

I used this recipe and altered it slightly.
Instead of chocolate chips, I used red and green M&M's and omitted the nuts.
They turned out thick and chewy just like I was looking for.
Coconut was just enough for me to enjoy, but not enough that small children shall detect it.  ;)
I would probably add just a bit more next time.

I may have enjoyed some leftovers with my morning coffee.
They do have oatmeal after all.  ;)

Tuesday, December 13, 2011

A Christmas twirly dress-and a semi tutorial


I made this dress for Maressa to wear to her Christmas preschool performance and party today.
I used to make cute things for the girls to wear for every single holiday occasion.
 I've gotten lazy.
And honestly, Kalla is almost 8.5 and kinda past the cutsie holiday wear (however I did promise an applique tree shirt for her party this Friday) and Maressa gets all the tons of hand-me-downs from holiday past.
This year I made Maressa a new dress to match her personality.
Nothing fancy.
Just used a plain white tee from her closet and let her pick some fabrics from my old stash.

Sorry there is not a full tutorial on this particular dress.
For those who want to know how to make your own twirly 3-tier dress of your own, I can guide you through the process.

First start here for a regular t-dress tutorial.
To make it with twirly tiers, instead of one big skirt piece you'll need to cut 3 pieces. 
This can be all the same fabric or different ones.
You'll want to make the 3 pieces to add up to the length of dress you want.
For example, Maressa generally wears a 5/6 size store dress (I like them plenty long).
I made her 3 pieces with the length of 7" 8" and 7".  You'll need to account for .5" on each edge for attaching to the other fabrics, bottom hem and to the shirt.
For this dress, I did the top tier the width of the fabric...selvage to selvage.
For the next tier I did the width 1.5 times that width and the bottom 1.5 times the width of the middle tier.

So if for example your fabric is 40" wide you will need the following strips to make a 5/6 size dress:
7" x 40"
8" x 60"
7" x  90"
For the middle and bottom strips you will need to sew together pieces to make the widths.
**Adjust lengths to fit different sizes.**
To know how long it should be total, I use a dress out of her closet that fits like I want to get my total finished length.

Tips:
Start from bottom up.
Sew your bottom tier strips together, serge/overlock edges, then hem the very bottom.
Gather the bottom tier and sew to middle tier.
Gather middle tier and sew to top tier.
Now gather and sew skirt to t-shirt.
Serge or overlock edges as you go.
Topstitch tiers once finished for nice look and dress to lay nicely.
Now hand to your very happy little girl for much twirling pleasure!

Monday, December 12, 2011

Kids Art Ornament

Maressa, 4 yrs, wanted to make a special gift for a very good friend of hers at school.
They've been bffs since meeting in 3 yr old class last year.
I guided her into making a cute ornament.
I figured that way, her friend can remember her early friendship even when they will part ways.

I was inspired by these adorable ornaments
 (will do the self portrait idea with all the kids for grandparent gifts too).
I had gathered these mini embroidery hoops maybe last year?
So we had all materials on hand...the best kind of DIY.

Maressa was set on making a fairy.  And something sparkly with glitter.
Before we started I had her practice her fairy drawing on a piece of paper.
Then I cut some soft white twill fabric.
Then I traced the inner hoop with a fabric crayon on the fabric and taped it down.
I gave her fabric crayons to draw her picture and color it in.
Then I used a paint brush to brush on fabric glue and let Maressa sprinkle on fabric glitter.
Then I used fabric markers to add the Merry Christmas and the to and from.

It was a simple and quick project and turned out just adorable.
She can't wait to give it to her friend tomorrow.

Friday, December 9, 2011

DIY Gifts your kids can make

I rounded up some of my favorite projects we've done over the years that kids can do with a little help.
I love to have my kids help make their teacher gifts and they proudly tell their teachers of their part.
And sometimes my kids want to give their friends a gift.  I don't mind, but we do homemade gifts in those cases.

FOR TEACHERS


FOR FRIENDS

Personalized tin lunch boxes--fill with art supplies or small toys


 I was thinking this idea could be turned into a cute 'Best Friends' shirt or something else cute and tween girlie.


Young sewers can tackle a pencil case with help.

Or a tote.
Art can be added with fabric markers or use a cute printed fabric.

FOR THE GRANDPARENTS

Could be cute Christmas dessert plates.

Maressa made an adorable ornament to give to her very best friend this afternoon.
Will share on Monday.  :)

LinkWithin

Related Posts with Thumbnails