Showing posts with label crafts. Show all posts

Tuesday, September 4, 2012

Kids Art: Magazine Collages and gift

collage2
Over summer break the kids and I did this art project.
I was inspired by a picture my nephew did for my mom that hung in her guest room while I was there recently.
Actually I was there to pick up my nephews and niece to come visit us for a week. 
We did this project while they were here.
I love many things about this project.
I loved that even the 5 yr old could do it all by herself.
I loved that it kept them busy for a long time…some of them a few days even.
I loved that it involved lots of cutting and pasting…not too messy, but messy enough for the kids to enjoy. 

collage1
We used my old magazines, old kids magazines and catalogs.
They poured over all of them finding just the right things that interested them.
It took Micah the Perfectionist a while to really get into it.
I even tried helping him and making suggestions when I came across a picture. 
I even found a big green bean (family joke…he didn’t think it was funny).
After they glued down all their pictures onto a canvas with mod podge, we glued down letters to spell their name.
They love their new artwork and they are all hanging in their rooms.

collage3
And it was the daddy’s bday.  So we collaborated and made him his own.
I’m thinking this will make great grandma and grandpa gifts as well.
We’ll be doing some more for sure!

Thursday, August 16, 2012

Make it: Easy and Simple Doll Chairs


agchair4
If any of you own an American Girl doll or the like, you quickly realize the thing cannot sit on it's own.
It needs to lean against something to get it to sit proper.
So we were having a Doll and Camping birthday party and I really needed to have all these dolls sitting around a campfire.
But where was I going to find a dozen chairs for them to sit in?
An idea came to me....I had some left over pieces from a cub scout book end project in the garage.

agchair3
I realized putting 2 pieces together made a primal type chair that sits on the floor, perfect size for Kalla's dolls.

agchair1
So to make some chairs like these here's what you need.
Don't be scared...I'm no carpenter.
I've never tried an Ana White project, nor do I have a saw.
I can use a hammer though.
So I went to Home Depot and got some lumber, a 10ft section of 1/2" thick piece that is about 5.5" wide.
I had the guy cut it down for me to 8" pieces.  For a dozen chairs (2 pieces each), this took 2 10ft sections.
So I ended up with 2 pieces of wood .5"x5.5"x8" per chair.

agchair2
Other than the wood, you need wood glue and some finishing nails (these nails are thin, won't split the wood and sinks down into the wood.
First you need to sand the edges well.  I do happen to have an electric sander which rocked my project way fast.
Then, I used wood glue to adhere the pieces together.
Little glue goes a long way.
Let it dry completely.

agchair3
Once dry, nail together across bottom with 3 nails.

agchair4
Then of course I had to have plenty of color.
Spray paint all sides.

agchair1
They are a little plain.  I thought about letting Kalla stencil or personalize hers.
i think they would be cute with the doll's initials.

agchair2

agchair6
Here they are in party action.

agchair5
And I let the party guests all take one home for their doll.
Kalla plays with her chairs all the time.
Now I should figure out a way to make a simple table.  :)

Tuesday, August 14, 2012

Make it: Foam board/duct tape accordion frame


foamframe1
It was hubby’s bday.
I had current, cute pics of kids, but no frames.
He has moved into a new office and cleaned out all old stuff and wanted new pics.
Enter my idea to make an accordion style frame with materials I had on hand.

foamframe3
Started with 4x6 photos printed off computer.
And a white foam board.

foamframe2
I used a sharp blade and ruler to cut four pieces of 5x7 pieces of foam board.

foamframe4
Added black duct tape to put all the pieces together.
I started by cutting a piece of tape and placing the long side of a piece of foam board not quite to the middle of the tape.

foamframe5
Apparently I missed a picture, but to add the next board, I stacked it on top of the board with the tape and folded the tape along the top of the next foam board. 
This is important to get the pieces to be able to bend.
When you open it, there should be bare tape in the middle like above.

foamframe6
I folded the edges of the ends over the foam board.
Then I placed another piece of duct tape on top.
As you can see I had pieces not matching up very well.

foamframe7
Easily remedied by another piece of tape matching up all the sides to look neat.
That’s the best thing about duct tape.  It’s so flexible in projects.

foamframe8
After connecting all four boards, I taped up the ends with a few pieces.

foamframe9
When done your boards should be able to fold up like this.

foamframe91
And will look like this standing up.
Once I had this done I used double sided tape to attach the pictures.
Then I used a few pieces of washi tape or printed masking tape on the corners of the pictures to jazz it up a little. 

I want to make one of these for the girls room with pretty printed duct tape.  Will share a girlie version soon!

Thursday, July 19, 2012

Vacation Memory Books

vacbooks1
Before our vacation to the beach last week, I whipped up these little blank books for the kids.
Every year on our trip to the beach, they like to record the trip in a book.
I ran out of Bare Books so this is how I improvised. 

vacbooks3
I took 5 pieces of white cardstock and one piece of colored cardstock and folded them in half. 
I find using a pencil helps create a nice crisp crease.
Then lay the white sheets on top of colored sheet and sew down the middle of the crease.

vacbooks2
I used stickers from my stash to decorate the front.
And a bit of washi tape and labels that came with a set of canning jars.

beachbook
I love looking at them at the end of the trip.
Maressa drew picture of her sand angel, some castles and waves.
Zachary filled up his whole book with diary style entries and lots of pictures.
One day I’m sure they will enjoy looking back and remembering.

Wednesday, March 7, 2012

Make some simple cute coasters

 coasters2
I’ve been crafting away.  But most projects are still in process.
Here’s a quick little project I was able to start and finish quickly this afternoon.
I picked up these cork coasters from Hobby Lobby the other day.
Decided to spruce them up with a little paint.

coasters1
All you need to make your own is above.  Craft paint, foam paint blotters and this cute little zebra print stencil…also found at Hobby Lobby.  I simply took each coaster and held down the stencil on top and blotted fun colors on top.

coasters5

coasters3

coasters6
I think they’d make cute gifts.  I have a greater purpose for my crafting.  More on that to come…

Wednesday, February 29, 2012

Bunting Bottle centerpiece/table decor

           
A few weeks ago I was asked to make some table centerpieces for a ladies retreat at church.
I needed to make 8 in specific colors for each table.
(Yellow is missing as the yellow table used my bunting for a craft later so I came home with just yellow bottles)
I started with all those coke bottles we drank at my last Christmas craft party.
I of course saved them all.
I gave them a nice coat of color with spray paint.
To make the bunting, I simply grabbed a bunch of my fabric scraps and folded pieces in half and cut the triangles (I used the first one as a template for the rest so they would all be the same size and shape).  Then I just sewed them all together along the top.
To anchor the bottles down a bit I poured rice down to the bottom to add a little weight.
Then I used clothespins to hang the bunting to the tops of the bottles.
How fun and simple would these be for parties?
Baby showers, wedding showers  or even weddings.

I love having them all on hand now in every color and can pull them out for a little decoration for all sorts of things.

Not to mention that the painted coke bottles would make great bud vases.

Tuesday, December 20, 2011

Easy globe ornament

We made these fun ornaments in a couple of the kids holiday parties at school.
I was inspired by this one on Parents.com, and changed it up a tiny bit.

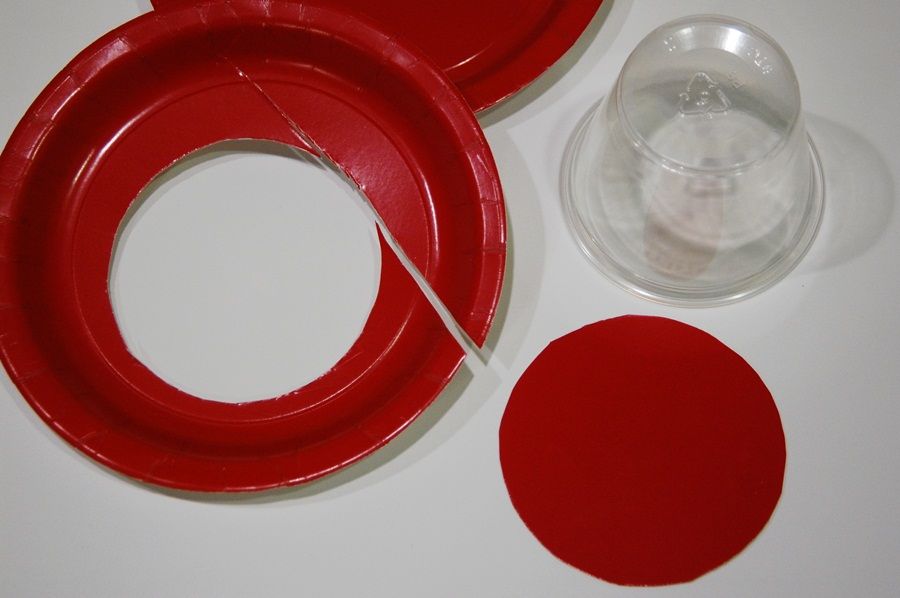
I used small paper plates and clear punch cups.
I traced the cups on the plates and cut out the circles.
Then used glue dots or hot glue to adhere the miniatures to the plate.
You can use any tiny miniatures.
I had these trees on hand and tiny reindeer and ballerinas I had used once on cupcakes.
I even used some snowman cupcake picks and just broke off the pick part.
After the miniatures are secure, we used craft glue around the edge of the plate.
Using a sharp needle, I threaded bakers twine in the top of the plastic cup.
Then I placed a small handful of plastic fake snow in the cups.
Then I placed the plate with glue on top of the cup.
Let the glue set.
Then turn it right side up.
If you want to add a pipe cleaner trim, put glue around the outside edge of the cup.
Regular pipe cleaners are just the right size.
Put ends together and over lap just a tiny bit and twist together forming a circle.
Place circle over the cup and push to the bottom onto the glue.
The most fun is you can shake it and the loose snow moves around.
Maressa's 4 yr old class and Micah's first grade class loved making these!

Monday, December 12, 2011

Kids Art Ornament

Maressa, 4 yrs, wanted to make a special gift for a very good friend of hers at school.
They've been bffs since meeting in 3 yr old class last year.
I guided her into making a cute ornament.
I figured that way, her friend can remember her early friendship even when they will part ways.

I was inspired by these adorable ornaments
 (will do the self portrait idea with all the kids for grandparent gifts too).
I had gathered these mini embroidery hoops maybe last year?
So we had all materials on hand...the best kind of DIY.

Maressa was set on making a fairy.  And something sparkly with glitter.
Before we started I had her practice her fairy drawing on a piece of paper.
Then I cut some soft white twill fabric.
Then I traced the inner hoop with a fabric crayon on the fabric and taped it down.
I gave her fabric crayons to draw her picture and color it in.
Then I used a paint brush to brush on fabric glue and let Maressa sprinkle on fabric glitter.
Then I used fabric markers to add the Merry Christmas and the to and from.

It was a simple and quick project and turned out just adorable.
She can't wait to give it to her friend tomorrow.

LinkWithin

Related Posts with Thumbnails